Installation/Usage
Instructions
- Servo Spacers
- Swash Leveling Zip Tools
- Micro Servo 90 Degree Tool
- Mini Servo 90 Degree Tool
- Standard Servo 90 Degree Tool
- 3.5 mm Under Swash Leveling Tool (USLT)
Patent Pending
- 5 mm Under Swash Leveling Tool (USLT) Patent
Pending
- 8 mm Under Swash Leveling Tool (USLT) Patent
Pending
- 10 mm Under Swash Leveling Tool (USLT)
Patent Pending
- 12 mm Under Swash Leveling Tool (USLT)
Patent Pending
- 14 mm Under Swash Leveling Tool (USLT)
Patent Pending
- Universal 250 - 450 Zero Pitch Tool
- Universal 500 - 700 Zero Pitch Tool
- TREX 700 Zero Pitch Tool
- Logo 400 Zero Pitch Tool
- Logo 500 Zero Pitch Tool
- Logo 600 Zero Pitch Tool
- TREX 500 FBL Pitch Alignment Tool
- TREX 600 FBL Pitch Alignment Tool
- Logo FBL Pitch Alignment Tool
- Compass 6HV FBL Pitch Alignment Tool
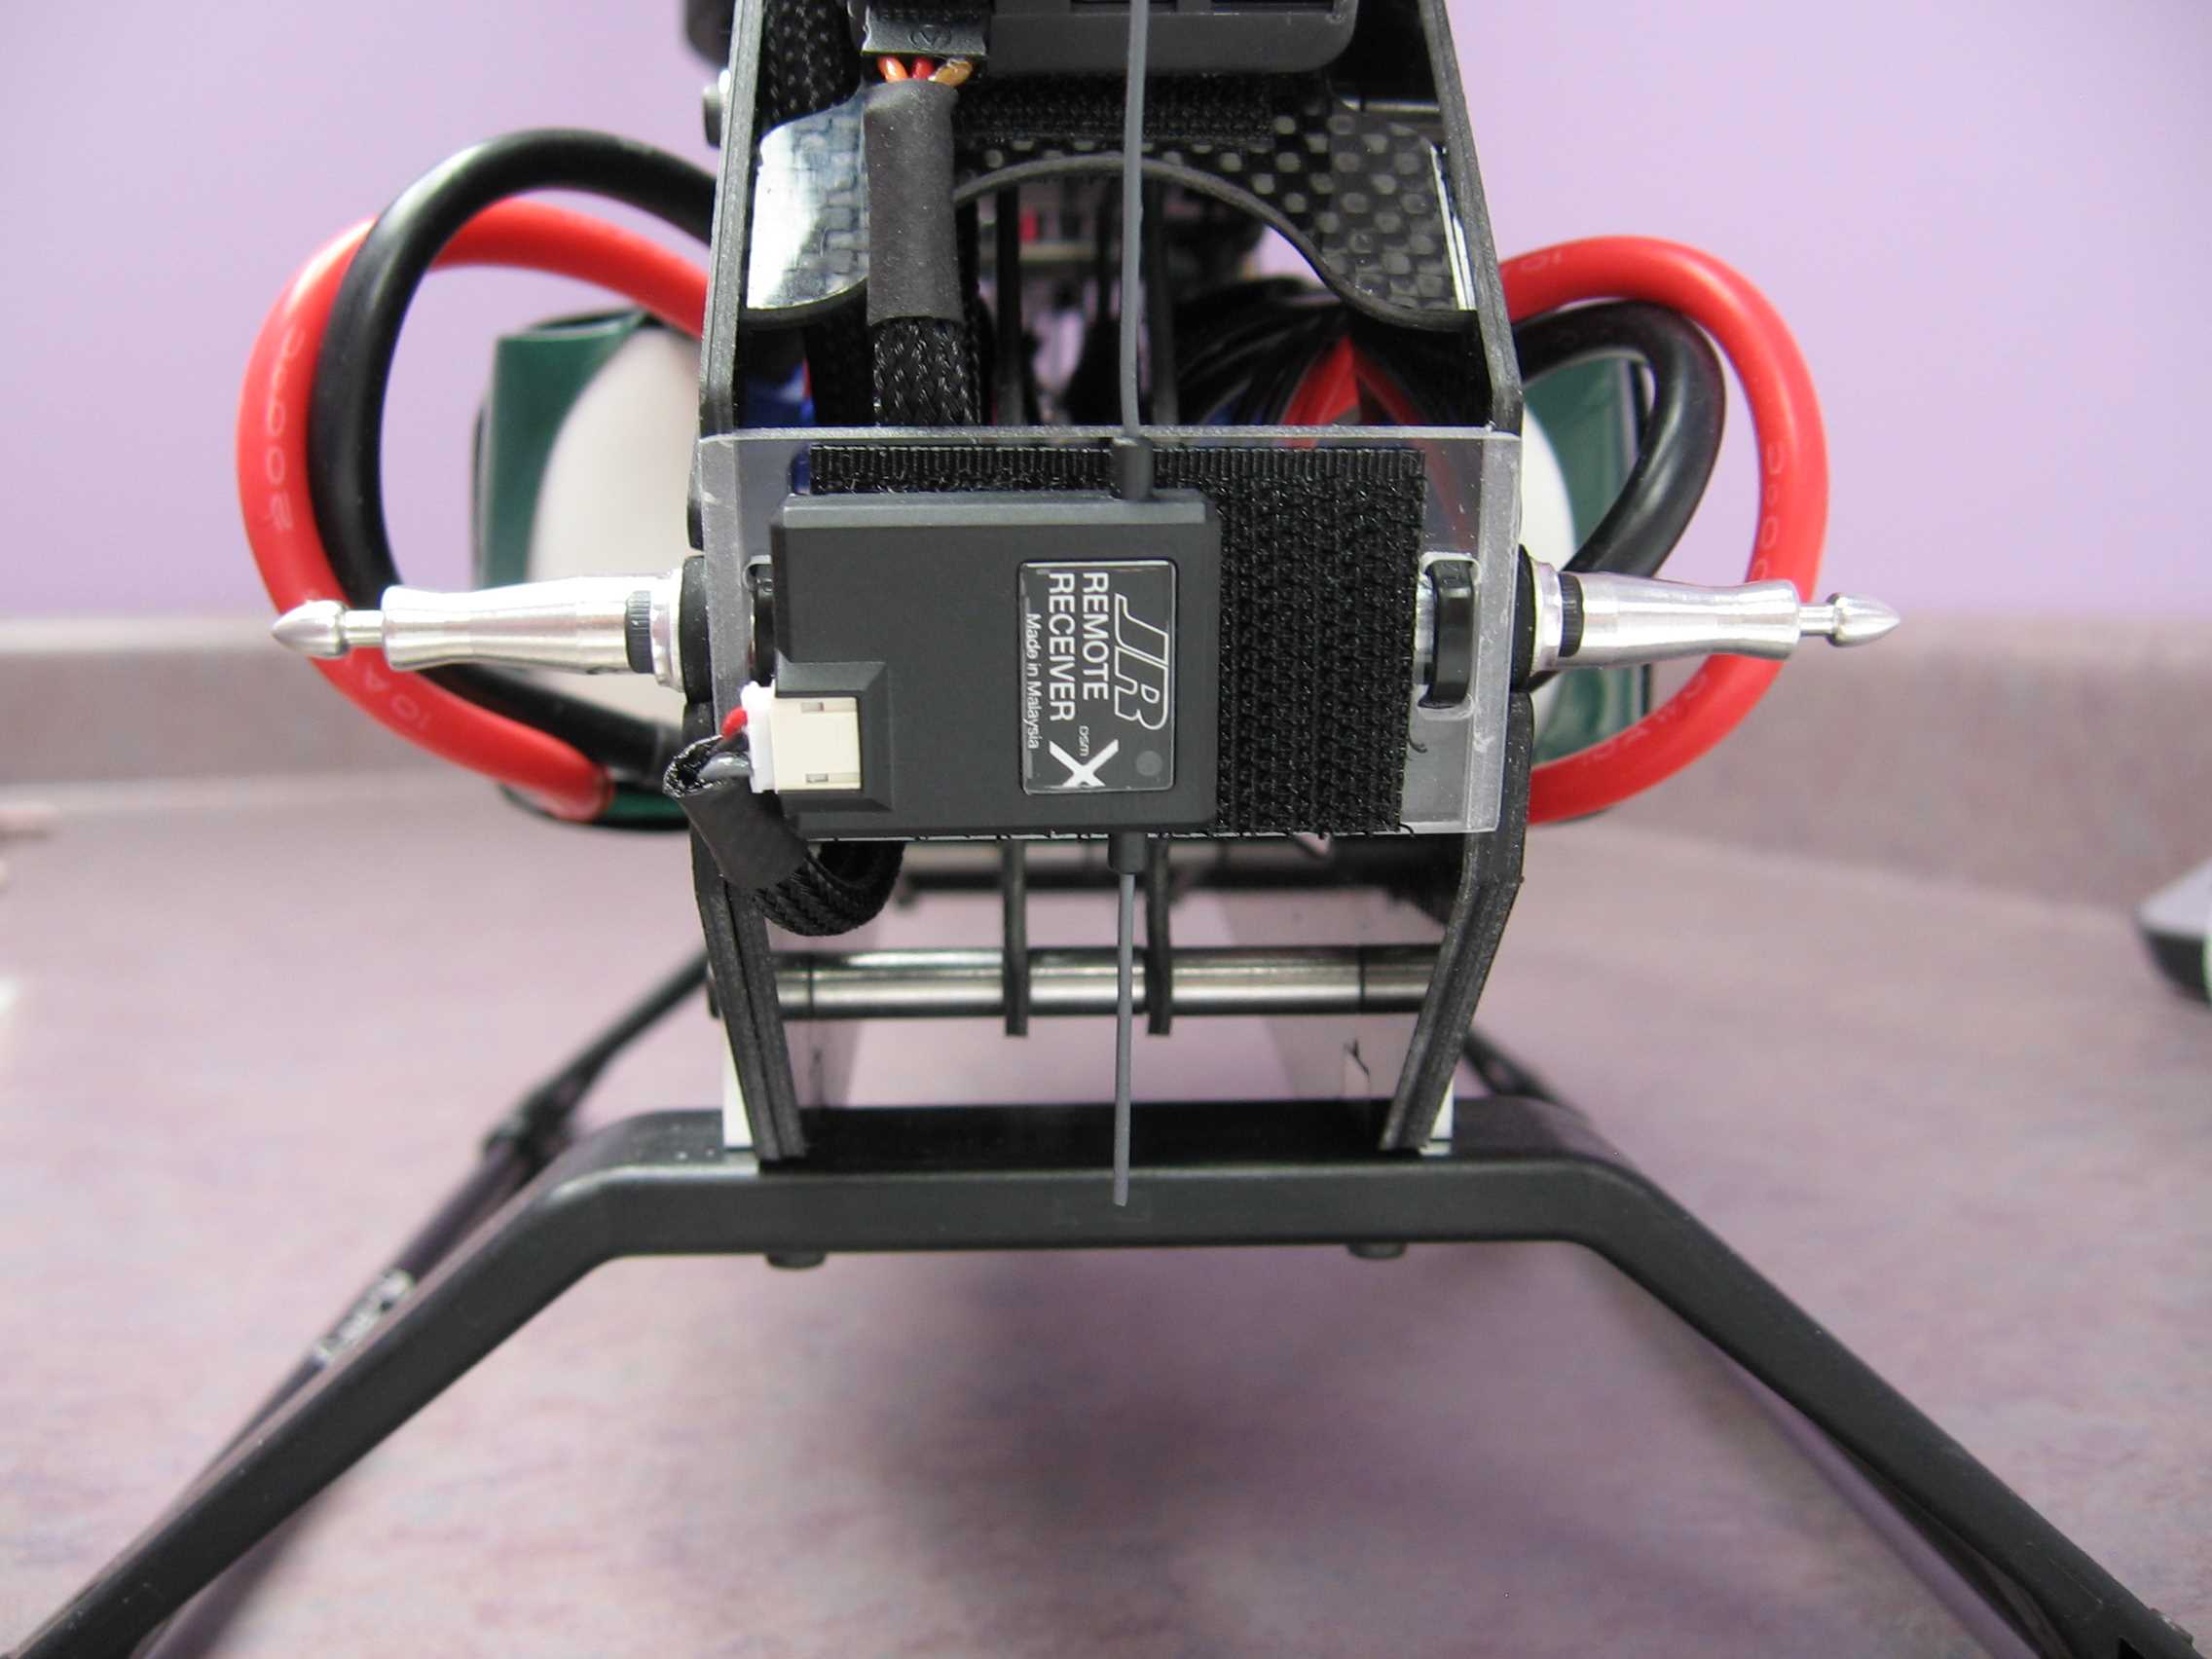
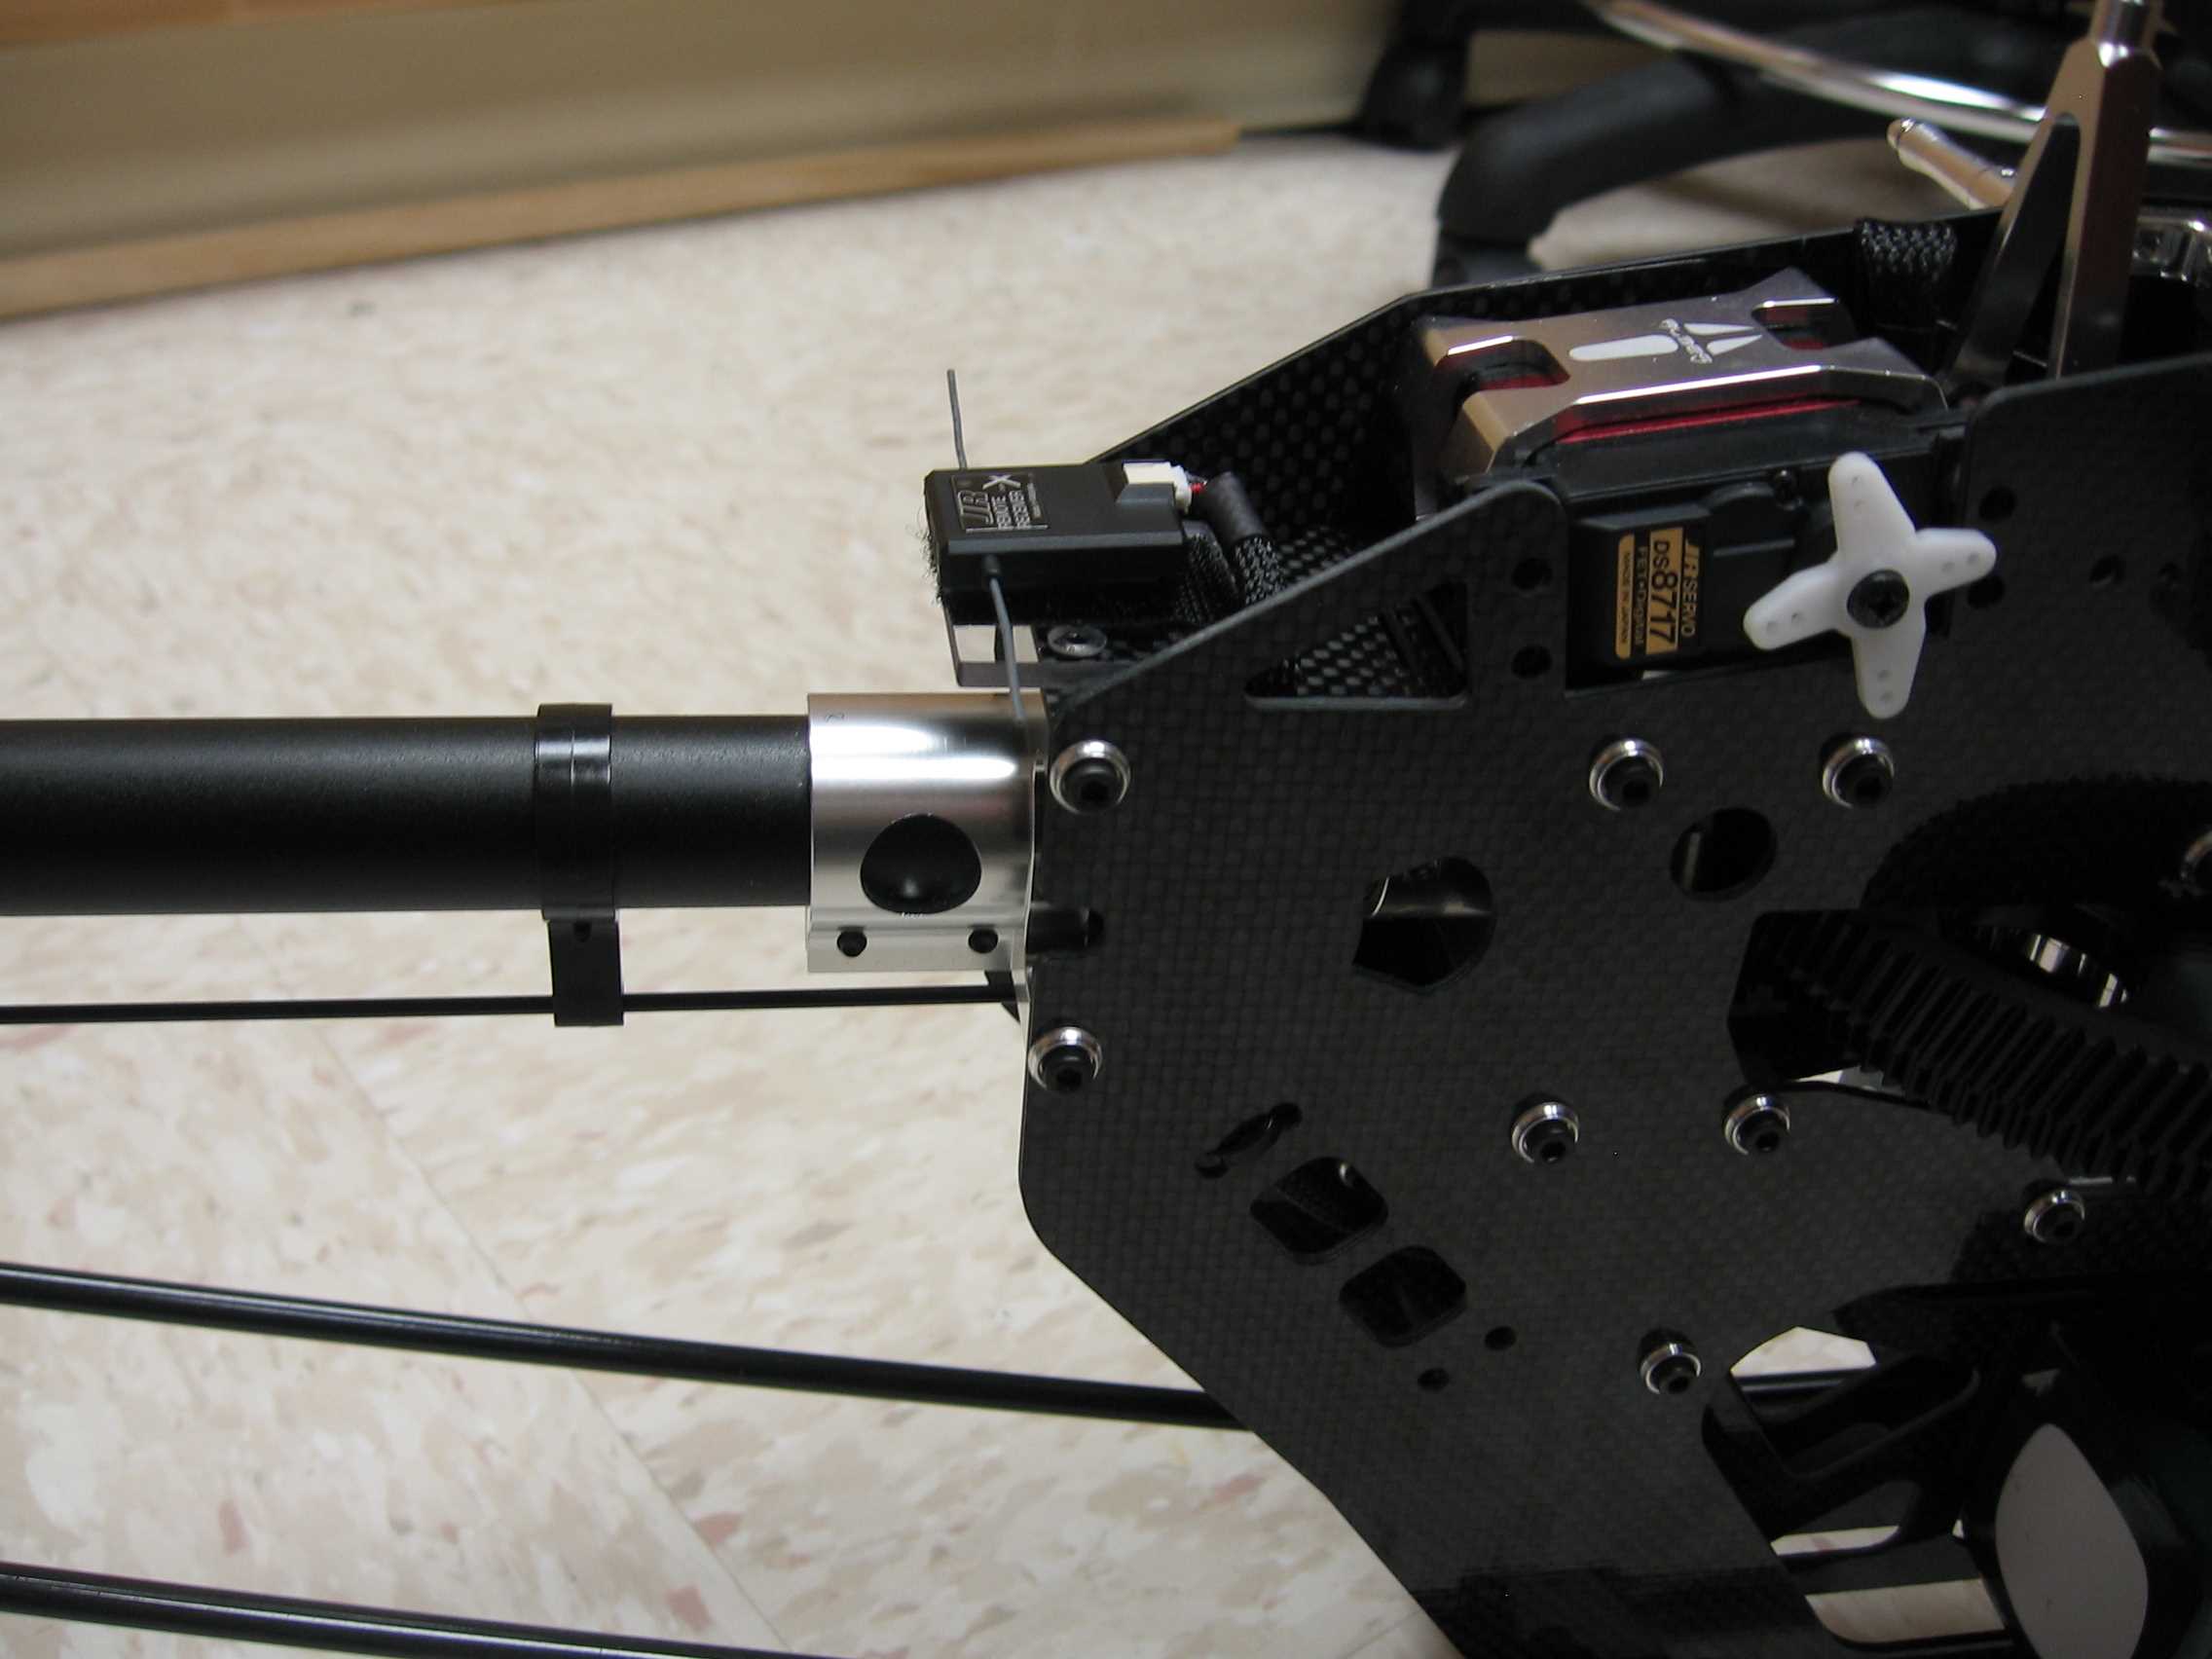
- TREX 450 Sport Gyro/Receiver Mount
- TREX 500 Gyro/Receiver Mount
- TREX 500 VBAR Mount
- Rush 750 Satellite Receiver Mounts
- mCP X 3-n-1 Mount (for Controller
Module)
- Ultimate TREX 500 Gyro Mount
- Ultimate TREX 550E/600E Gyro Mount
- Ultimate TREX 550N/600N Gyro Mount
- TREX 600 Gyro/Receiver Mount
- TREX 600 VBAR Mount
- TREX 450 Battery Mount
- TREX 500 Battery Mount
- Inverted Gyro Mount (The Thingy)
- Gaui 200 Gyro/Receiver Mount
- TREX 250 Flybar Lock
- TREX 450 Plastic Flybar Lock
- TREX 450 V1 Flybar Lock
- TREX 450 V2 Flybar Lock
- TREX 450 Sport Flybar Lock
- TREX 450 Pro Flybar Lock
- EXI 450 Flybar Lock
- Adjustable 450 Flybar Lock
- Adjustable 500 Flybar Lock (Fits TREX 500
series and similar heads)
- TREX 500 Flybar Lock (fits heads with
plastic seesaw)
- TREX 500 ESP Flybar Lock (fits heads with
the metal seesaw)
- TREX 500E Pro Flybar Lock
- TREX 550 ESP Flybar Lock
- Outrage 550 Flybar Lock
- Gaui X5 Flybar Lock
- TREX 600 Flybar Lock (fits original plastic
and original metal seesaws)
- TREX 600 ESP Flybar Lock (fits latest
lighter metal seesaws)
- TREX 700 Flybar Lock
- TREX 450 Night Fins (1 Horizontal and 1
Vertical)
- TREX 450 Night Fins w/Slotted Text (1
Horizontal and 1 Vertical)
- Slotted Finless Fins & 3D Fins
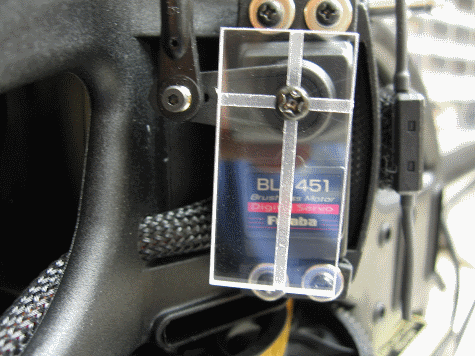
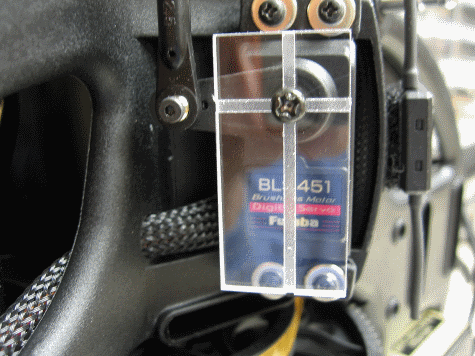
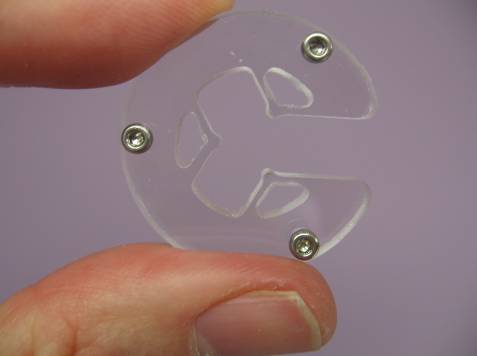
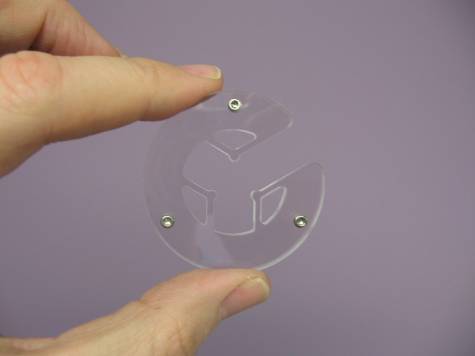
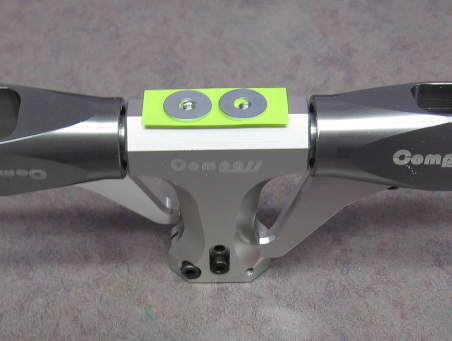
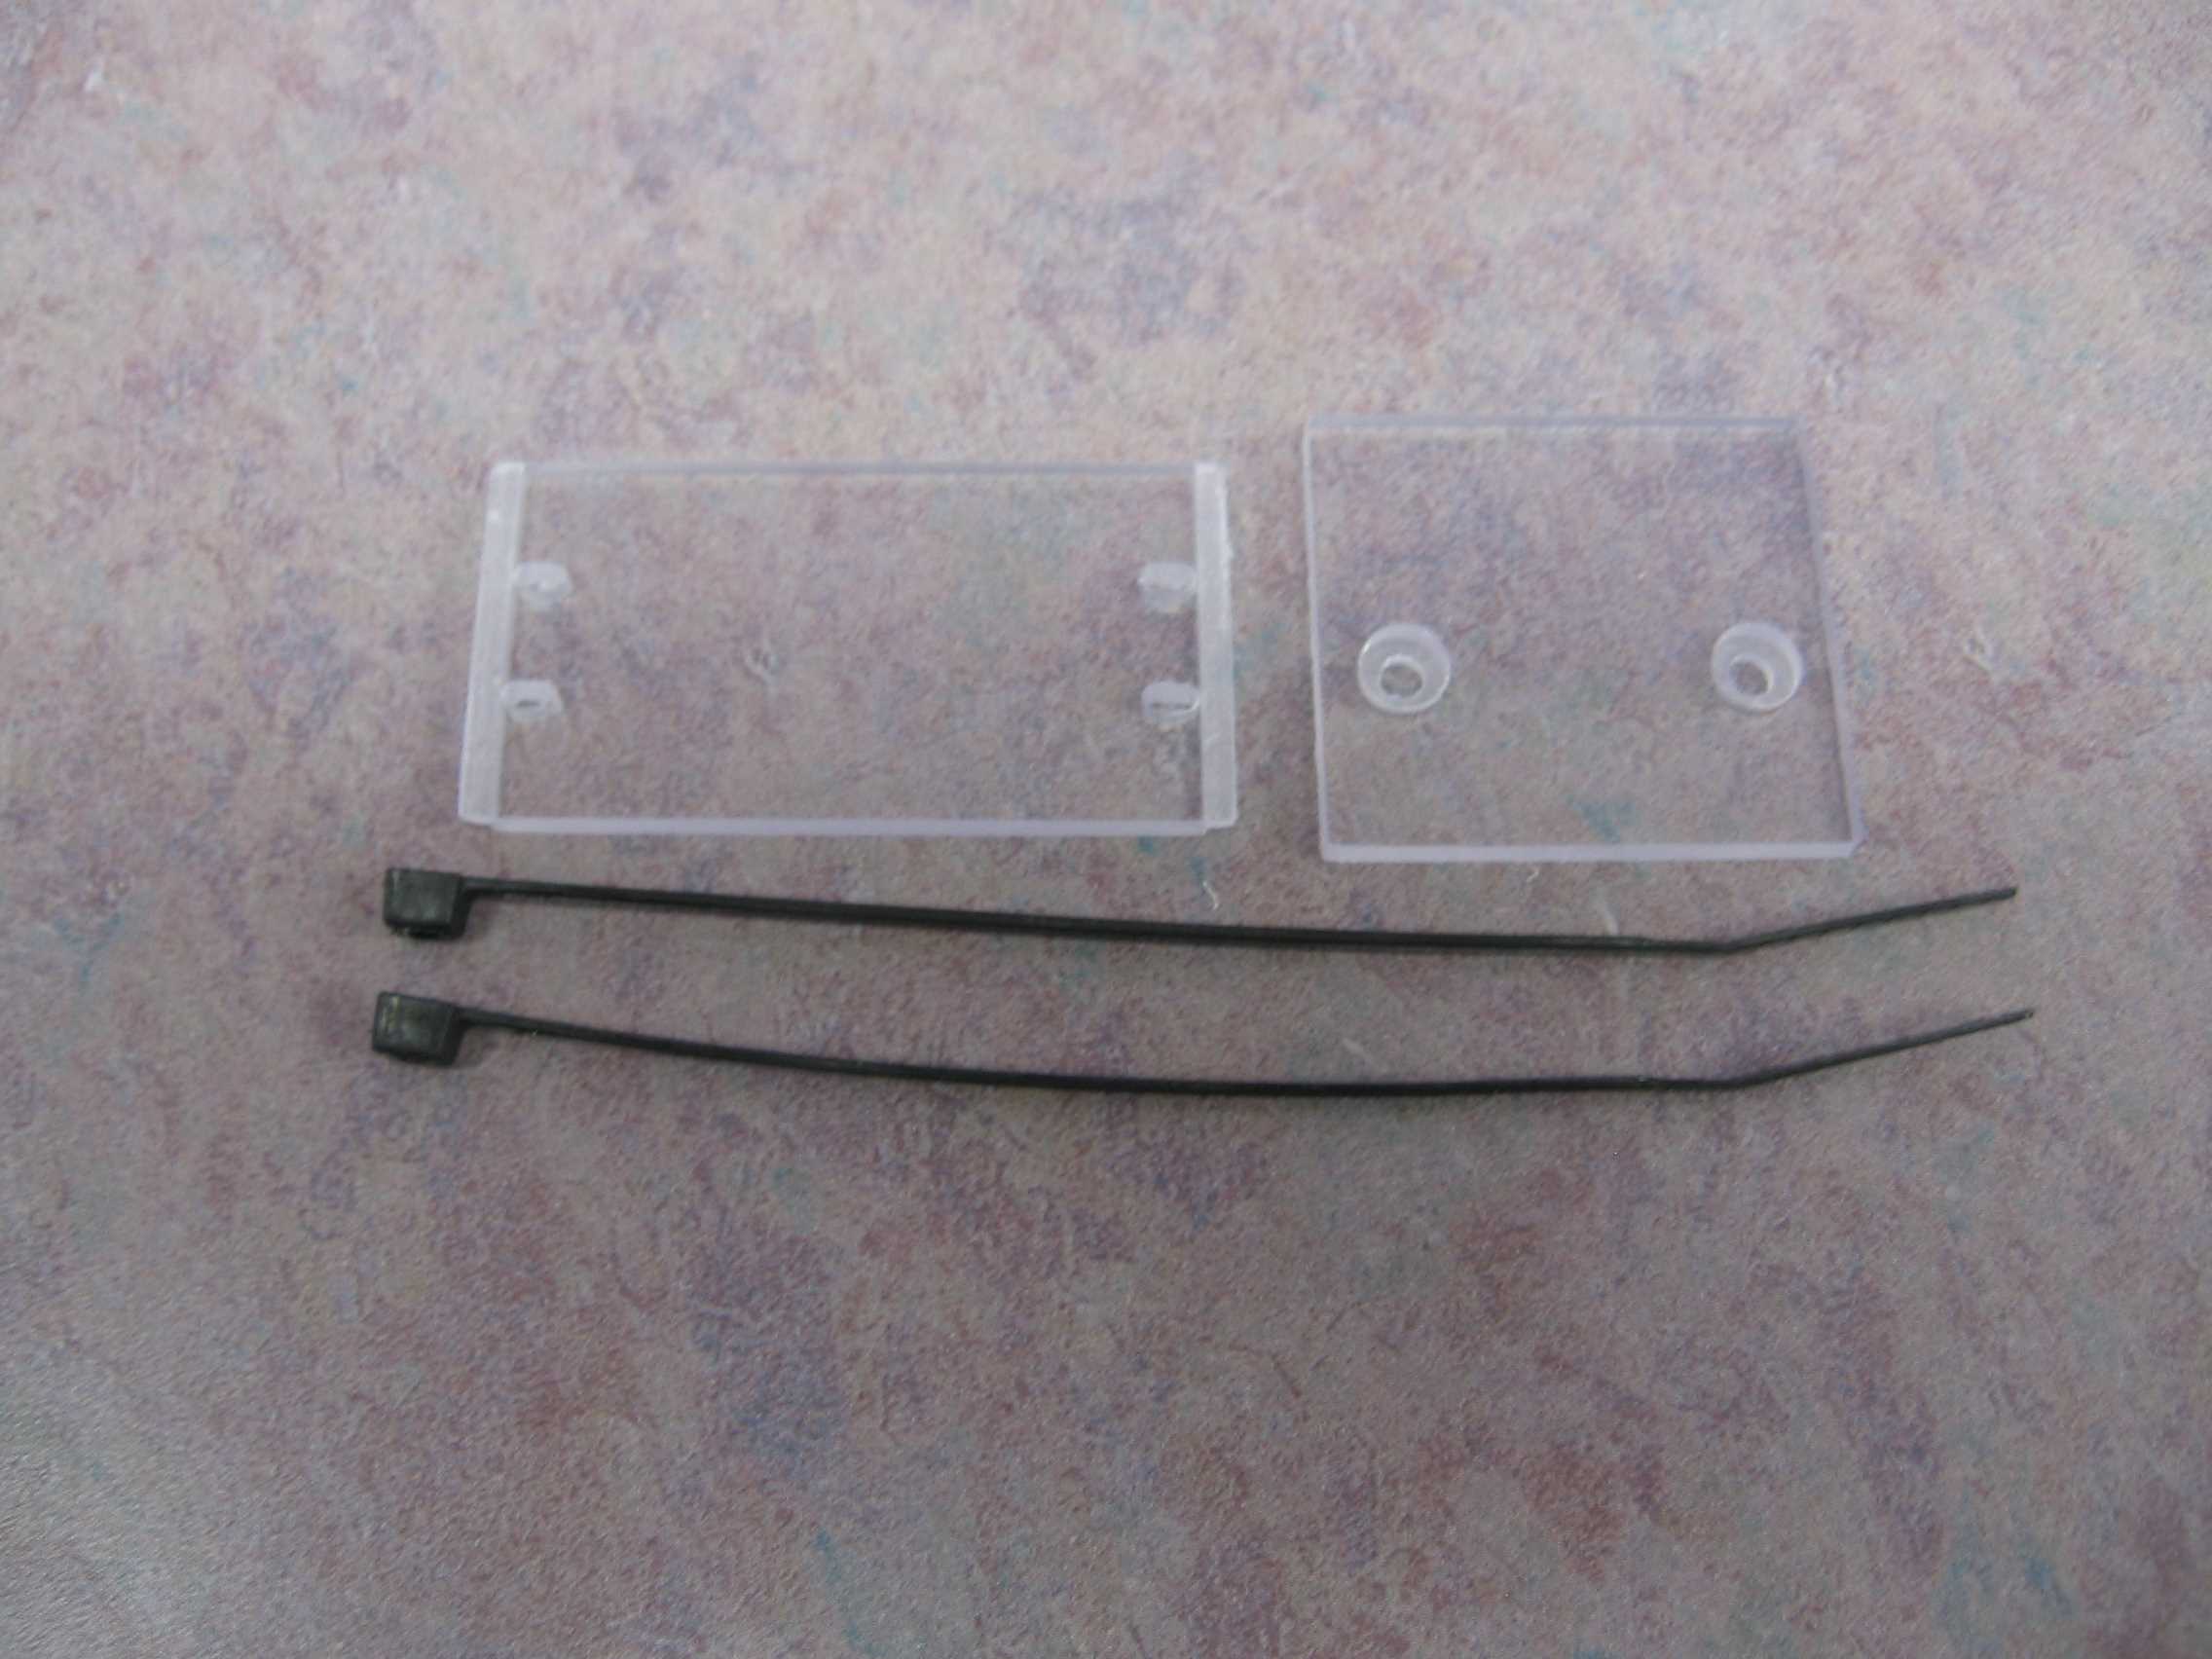
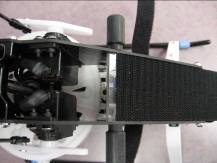
Servo
Spacers
These
spacers allow you to stabilize your servos securely without the stock
rubber grommets. Package of four will mount 1 servo.


Press fit the servo spacers over the servo holes then mount
with existing screws and washers. Tighten screws snugly but do not over
tighten as it is not necessary and it may damage the part and/or the
servo mounting hardware. Match the Servo Spacer part number with the
dimensions of the servo you are mounting. The servo hole size and your
desired screw size are all used to determine which Servo Spacer you
need.
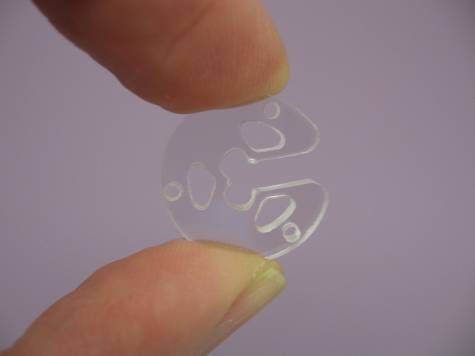
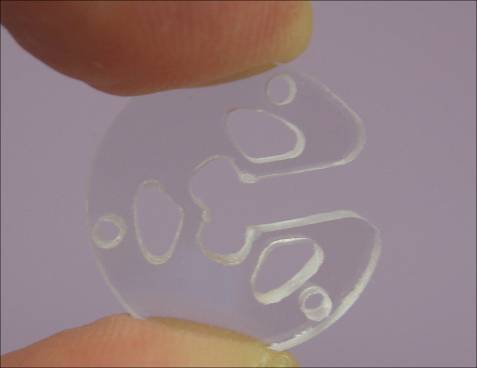
Note:
The Polycarbonate part can be modified with a fine wood file if required
Note:
Let me know if you had to modify the part and I'll make future parts
better.
If you need other sizes, here is a guide to currently supported sizes:

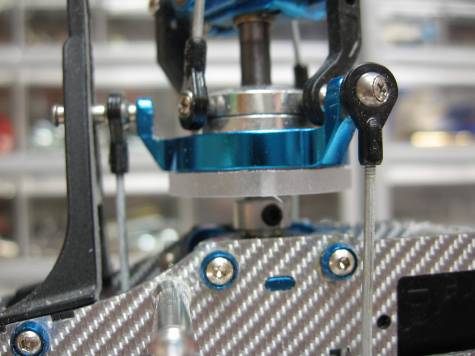
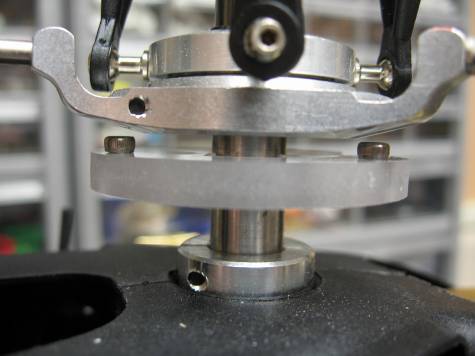
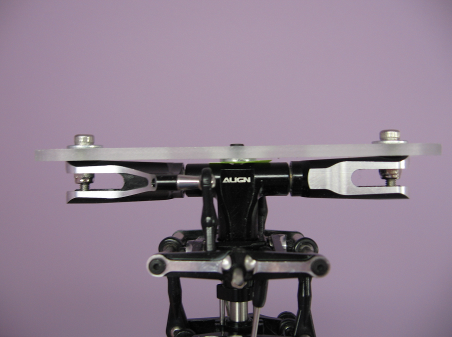
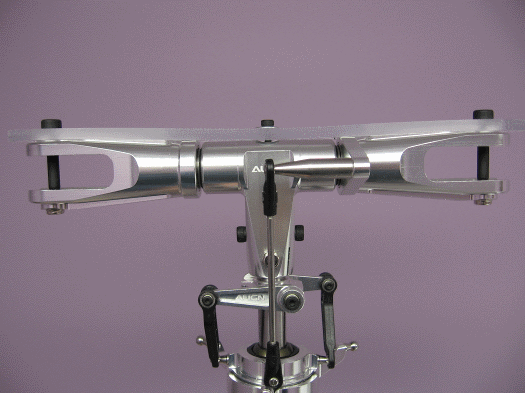
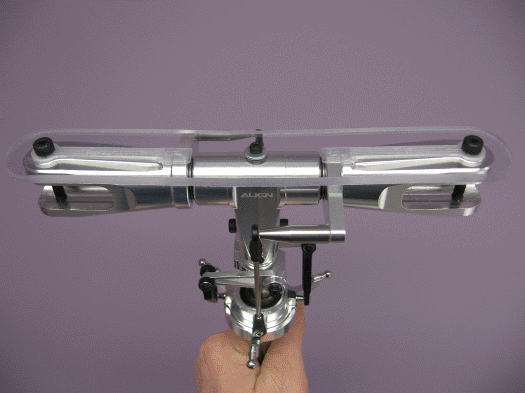
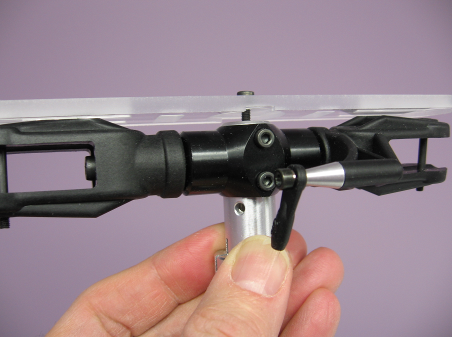
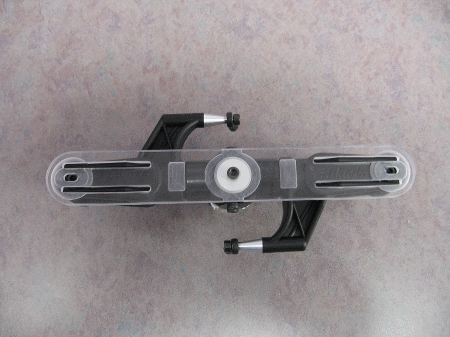
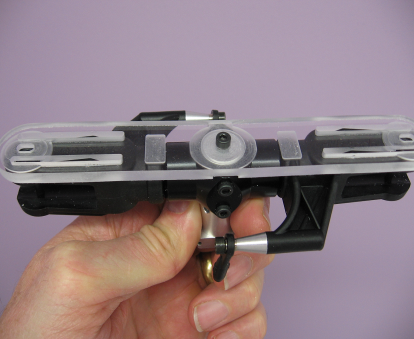
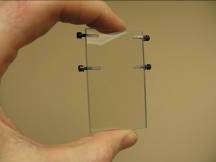
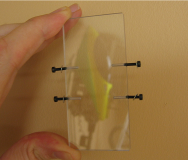
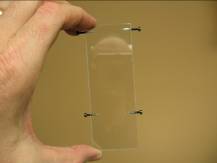
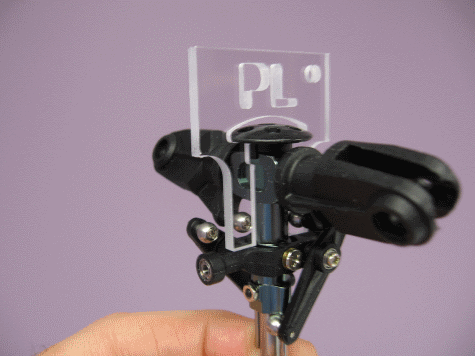
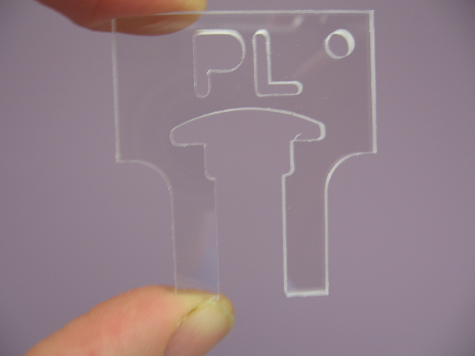
Swash
Leveling Zip Tools Patent
Pending
This tool allows you to level your swash plate WITHOUT
removing the head. Polycarbonate tool won�t scratch your heli.
Press fit the tool onto the main shaft just over the swash
plate and it provides a level surface to use as a reference while leveling
your swash. Once the tool is installed, adjust the contact point to just
touch anywhere on one swash linkage. You can then turn the shaft with the
tool attached and use it to adjust the others to the exact same height.
This tool is similar in concept to a zip tie, but it is easier to attach
and remove and it has an adjustable contact point which allows for optimum
accuracy.
Note: If the Polycarbonate tool can touch any of the swash
linkage, you don�t need to use the adjustment screw.
Note: Measurement can be made to any convenient part of the
swash linkage, not just the spot shown in my picture.
Note: Try using the head side of the screw if the holes don�t
line with what you want to measure.
Note: Do not leave the tool in a flexed state on a main shaft
when not in use.
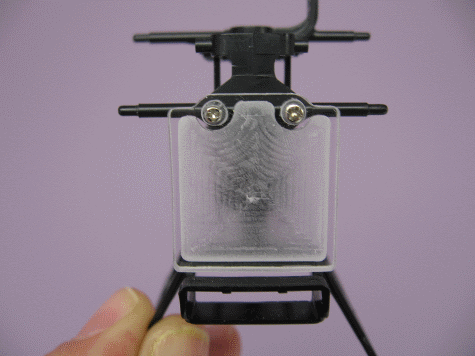
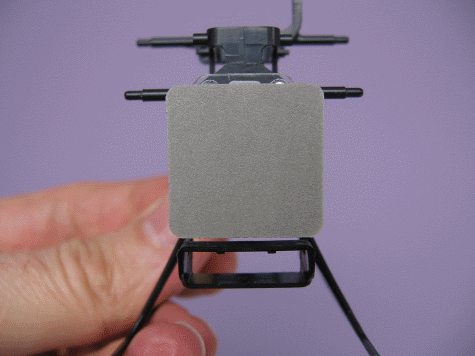
Micro
Servo 90 Degree Tool
This tool to makes it easy to align servo horns at 90 degrees
on your micro size servos. With the shape of many horns, it�s difficult to
eyeball it perfectly without the help of a tool. Lexan tool won�t scratch
your paint.
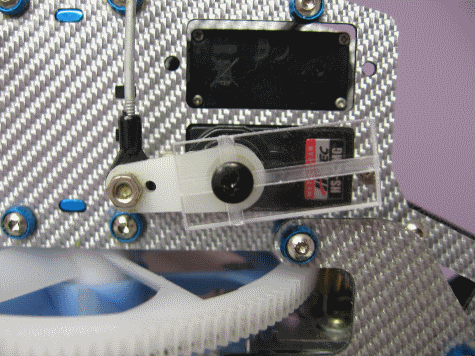
This tool can be used on or off the heli, with or without
linkages. Line up a slot with the horn holes then snug it down. Use
sub-trim to line up the edge of the tool with the outside edge of the
servo and you are done. It's similar to using a pitch gauge. Flip it over
for servos with the horn on the other side. You may need a longer servo
screw to mount. (not supplied)
Note: Peel protective paper off all Lexan before use (if
there is any)
Note: Milling artifacts can be removed by scraping carefully
along the edges with a fingernail, Exacto knife or 220 sand paper.
Mini
Servo 90 Degree Tool
This tool to makes it easy to align servo horns at 90 degrees
on your mini size servos. With the shape of many horns, it�s difficult to
eyeball it perfectly without the help of a tool. Lexan tool won�t scratch
your paint.
This tool can be used on or off the heli, with or without
linkages. Line up a slot with the horn holes then snug it down. Use
sub-trim to line up the edge of the tool with the outside edge of the
servo and you are done. It's similar to using a pitch gauge. Flip it over
for servos with the horn on the other side. You may need a longer servo
screw to mount. (not supplied)
Note: Peel protective paper off all Lexan before use (if
there is any)
Note: Milling artifacts can be removed by scraping carefully
along the edges with a fingernail, Exacto knife or 220 sand paper.
Standard
Servo 90 Degree Tool
This tool to makes it easy to align servo horns at 90 degrees
on your standard size servos. With the shape of many horns, it�s difficult
to eyeball it perfectly without the help of a tool. Lexan tool won�t
scratch your paint.

This tool can be used on or off the heli, with or without
linkages. Line up a slot with the horn holes then snug it down. Use
sub-trim to line up the edge of the tool with the outside edge of the
servo and you are done. It's similar to using a pitch gauge. Flip it over
for servos with the horn on the other side. You may need a longer servo
screw to mount. (not supplied)
Note: Peel protective paper off all Lexan before use (if
there is any)
Note: Milling artifacts can be removed by scraping carefully
along the edges with a fingernail, Exacto knife or 220 sand paper.
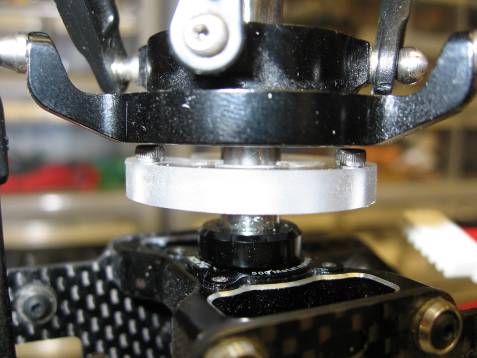
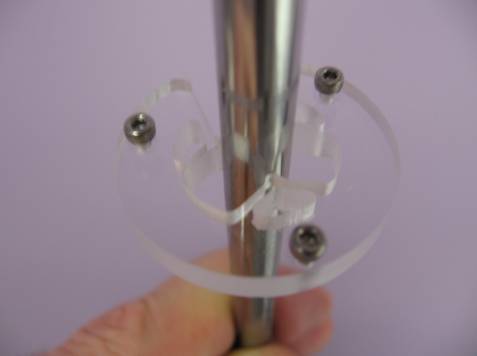
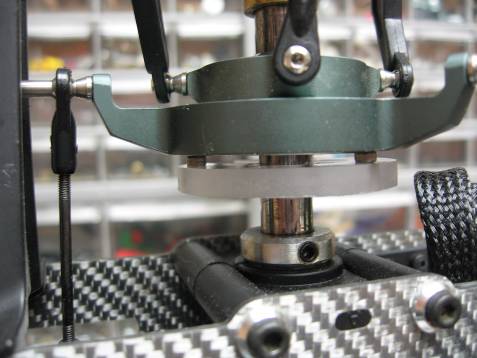
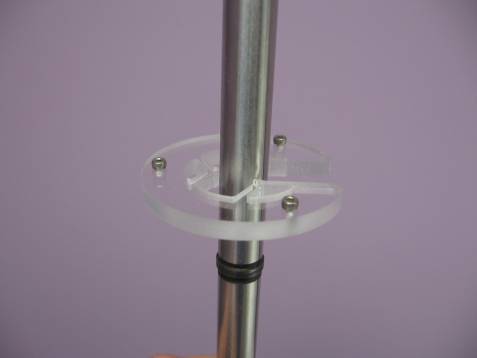
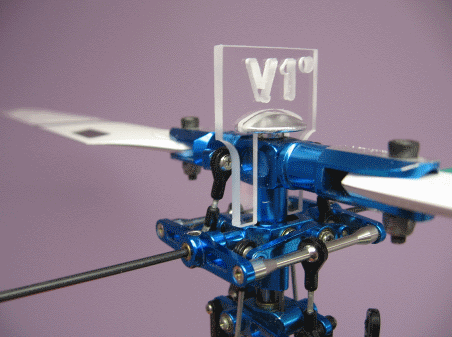
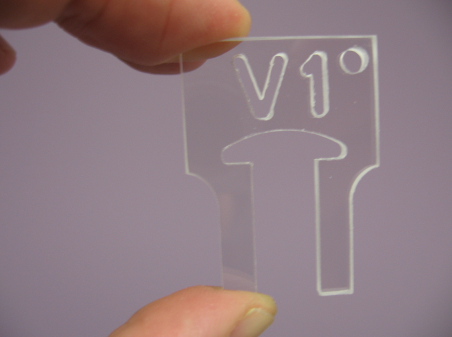
3.5 mm
Under Swash Leveling Tool (USLT) Patent Pending
This tool allows you to level your swash plate WITHOUT
removing the head. Lexan tool won�t scratch your heli.


Press fit the tool onto the main shaft just under or over the
swash plate and it provides a level surface to use as a reference while
leveling your swash. Once the tool is installed, turn it on the shaft a
few times to allow it to level itself. Spin the main shaft to verify it is
level and manually adjust if needed until the tool is perfectly level.
Avoid touching the tool once it is level. Tip the tool up or down while
removing to make removal easier.
Note: Peel protective paper off all Lexan before use (if
there is any)
Note: Remember to remove tool when done with adjustments.
Some have attached a red ribbon to help them remember.
Note: Milling artifacts can be removed by scraping carefully
along the edges with a fingernail, Exacto knife or 220 sand paper.
5 mm
Under Swash Leveling Tool (USLT) Patent Pending
This tool allows you to level your swash plate WITHOUT
removing the head. Lexan tool won�t scratch your heli.

Press fit the tool onto the main shaft just under or over the
swash plate and it provides a level surface to use as a reference while
leveling your swash. Once the tool is installed, turn it on the shaft a
few times to allow it to level itself. Spin the main shaft to verify it is
level and manually adjust if needed until the tool is perfectly level.
Avoid touching the tool once it is level. Tip the tool up or down while
removing to make removal easier.
Note: Peel protective paper off all Lexan before use (if
there is any)
Note: Remember to remove tool when done with adjustments.
Some have attached a red ribbon to help them remember.
Note: Milling artifacts can be removed by scraping carefully
along the edges with a fingernail, Exacto knife or 220 sand paper.
8 mm
Under Swash Leveling Tool (USLT) Patent Pending
This tool allows you to level your swash plate WITHOUT
removing the head. Lexan tool won�t scratch your heli.
Press fit the tool onto the main shaft just under or over the
swash plate and it provides a level surface to use as a reference while
leveling your swash. Once the tool is installed, turn it on the shaft a
few times to allow it to level itself. Spin the main shaft to verify it is
level and manually adjust if needed until the tool is perfectly level.
Avoid touching the tool once it is level. Tip the tool up or down while
removing to make removal easier.
Note: Peel protective paper off all Lexan before use (if
there is any)
Note: Remember to remove tool when done with adjustments.
Some have attached a red ribbon to help them remember.
Note: Milling artifacts can be removed by scraping carefully
along the edges with a fingernail, Exacto knife or 220 sand paper.
10 mm
Under Swash Leveling Tool (USLT) Patent Pending
This tool allows you to level your swash plate WITHOUT
removing the head. Lexan tool won�t scratch your heli.

Press fit the tool onto the main shaft just under or over the
swash plate and it provides a level surface to use as a reference while
leveling your swash. Once the tool is installed, turn it on the shaft a
few times to allow it to level itself. Spin the main shaft to verify it is
level and manually adjust if needed until the tool is perfectly level.
Avoid touching the tool once it is level. Tip the tool up or down while
removing to make removal easier.
Note: Peel protective paper off all Lexan before use (if
there is any)
Note: Remember to remove tool when done with adjustments.
Some have attached a red ribbon to help them remember.
Note: Milling artifacts can be removed by scraping carefully
along the edges with a fingernail, Exacto knife or 220 sand paper.
12 mm
Under Swash Leveling Tool (USLT) Patent Pending
This tool allows you to level your swash plate WITHOUT
removing the head. Lexan tool won�t scratch your heli.
Press fit the tool onto the main shaft just under or over the
swash plate and it provides a level surface to use as a reference while
leveling your swash. Once the tool is installed, turn it on the shaft a
few times to allow it to level itself. Spin the main shaft to verify it is
level and manually adjust if needed until the tool is perfectly level.
Avoid touching the tool once it is level. Tip the tool up or down while
removing to make removal easier.
Note: Peel protective paper off all Lexan before use (if
there is any)
Note: Remember to remove tool when done with adjustments.
Some have attached a red ribbon to help them remember.
Note: Milling artifacts can be removed by scraping carefully
along the edges with a fingernail, Exacto knife or 220 sand paper.
14 mm
Under Swash Leveling Tool (USLT) Patent Pending
This tool allows you to level your swash plate WITHOUT
removing the head. Lexan tool won�t scratch your heli.
Press fit the tool onto the main shaft just under or over the
swash plate and it provides a level surface to use as a reference while
leveling your swash. Once the tool is installed, turn it on the shaft a
few times to allow it to level itself. Spin the main shaft to verify it is
level and manually adjust if needed until the tool is perfectly level.
Avoid touching the tool once it is level. Tip the tool up or down while
removing to make removal easier.
Note: Peel protective paper off all Lexan before use (if
there is any)
Note: Remember to remove tool when done with adjustments.
Some have attached a red ribbon to help them remember.
Note: Milling artifacts can be removed by scraping carefully
along the edges with a fingernail, Exacto knife or 220 sand paper.
Universal
250 - 450 Zero Pitch Tool
This tool mounts on top the head and locks the blade grips at
zero pitch to allow easy adjustment of links. This tool will work for most
250 � 450 size heads with flat topped blade grips and tee. Lexan tool
won�t scratch your paint.
Use supplied washers between screw heads and tool and
avoid over tightening. Otherwise tool may be damaged.
Remove the head button. Use the head button screw(s) to
center the Zero Pitch tool and screw in just a few turns. Now turn the
blade grips to zero pitch and partially screw to the blade grips using the
blade grip screws. Now snug all screws till secure. May need additional
washers/paper under tool or longer screws as necessary to make all
surfaces level (not supplied). Now you can easily adjust your links.
Note: Additional screws/washers may be needed for some heads.
Use paper to protect the head from scratching. (Not supplied)
Note: Orient with milled channels down for grips with
protruding tops such as some TREX grips.
Note: Milling artifacts can be removed by scraping carefully
along the edges with a fingernail, Exacto knife or 220 sand paper.
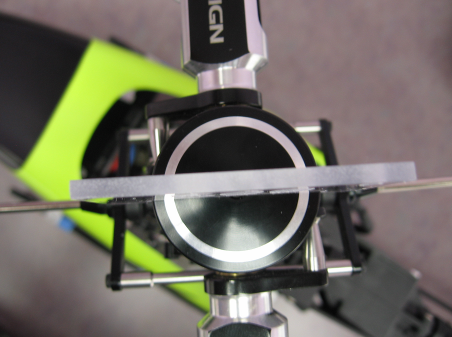
Universal
500 - 700 Zero Pitch Tool
This tool mounts on top the head and locks the blade grips at
zero pitch to allow easy adjustment of links. This tool will work for most
500 � 700 size heads with flat topped blade grips and tee. Lexan tool
won�t scratch your paint.

Use supplied washers between screw heads and tool and
avoid over tightening. Otherwise tool may be damaged.
Remove the head button. Use the head button screw(s) to
center the Zero Pitch tool and screw in just a few turns. Now turn the
blade grips to zero pitch and partially screw to the blade grips using the
blade grip screws. Now snug all screws till secure. May need additional
washers/paper under tool or longer screws as necessary to make all
surfaces level (not supplied). Now you can easily adjust your links.
Note: Additional screws/washers may be needed for some heads.
Use paper to protect the head from scratching. (Not supplied)
Note: Orient with milled channels down for grips with
protruding tops such as some TREX grips.
Note: Milling artifacts can be removed by scraping carefully
along the edges with a fingernail, Exacto knife or 220 sand paper.
TREX 700
Zero Pitch Tool
This tool mounts on top the head and locks the blade grips at
zero pitch to allow easy adjustment of links. Blades can be on or off.
Lexan tool won�t scratch your paint.
Use supplied washers between screw heads and tool and
avoid over tightening. Otherwise tool may be damaged.
Remove the head button. Press the tool down over each blade
grip one at a time. Use the head button screw to stabilize the Zero Pitch
tool. Install blade grip screws if not secure enough. Now you can easily
adjust your links.
Note: Peel protective paper off all Lexan before use (if
there is any)
Note: Milling artifacts can be removed by scraping carefully
along the edges with a fingernail or an Exacto knife.
Note: Edges can be sanded with 220 grit sand paper if there
are rough edges or burrs.
Logo 400
Zero Pitch Tool
This tool mounts on top the head and locks the blade grips at
zero pitch to allow easy adjustment of links. Blades can be on or off.
Lexan tool won�t scratch your paint.
Remove the head button. Use the head button screw to center
the Zero Pitch tool and screw in just a few turns. Now turn the blade
grips to zero pitch and slide the tool down over the ribs on top of the
grip till they are secure. Screw the tool down till it is snug. Over tightening will damage part.
Install blade grip screws if not secure enough. Now you can easily adjust
your links.
Note: Peel protective paper off all Lexan before use (if
there is any)
Note: Milling artifacts can be removed by scraping carefully
along the edges with a fingernail or an Exacto knife.
Note: Edges can be sanded with 220 grit sand paper if there
are rough edges or burrs.
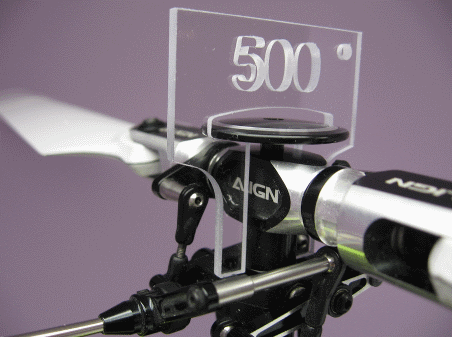
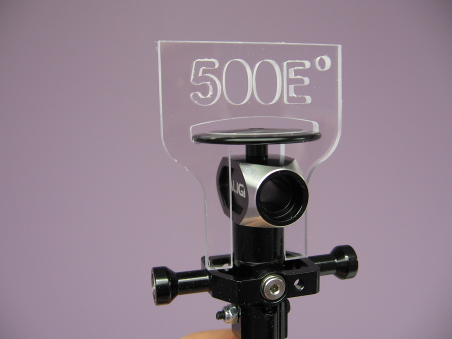
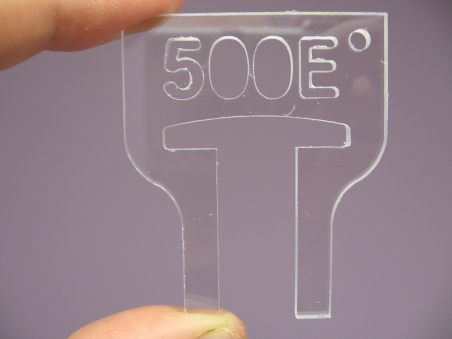
Logo 500
Zero Pitch Tool
This tool mounts on top the head and locks the blade grips at
zero pitch to allow easy adjustment of links. Blades can be on or off.
Lexan tool won�t scratch your paint. Fits Logo 400 as well.
Remove the head button. Use the head button screw to center
the Zero Pitch tool and screw in just a few turns. Now turn the blade
grips to zero pitch and slide the tool down over the ribs on top of the
grip till they are secure. Screw the tool down till it is snug. Over tightening will damage part.
Install blade grip screws if not secure enough. Now you can easily adjust
your links.
Note: Peel protective paper off all Lexan before use (if
there is any)
Note: Milling artifacts can be removed by scraping carefully
along the edges with a fingernail or an Exacto knife.
Note: Edges can be sanded with 220 grit sand paper if there
are rough edges or burrs.
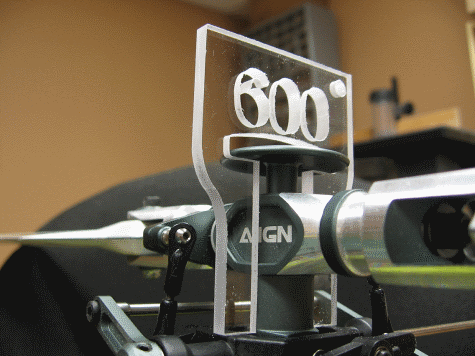
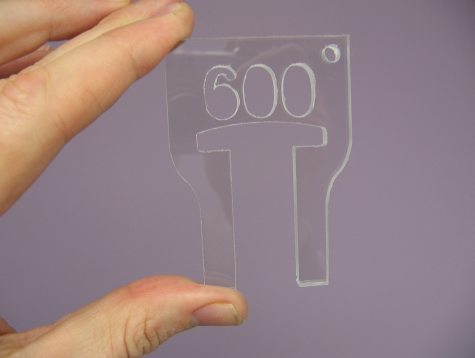
Logo 600
Zero Pitch Tool
This tool mounts on top the head and locks the blade grips at
zero pitch to allow easy adjustment of links. Blades can be on or off.
Lexan tool won�t scratch your paint.
Remove the head button. Slide the tool down over the ribs on
the top of the blade grips till they are secure while centering the tool
over the head button hole. Use the head button screw to tighten the Zero
Pitch tool down till it is snug. Over tightening
will damage part. Now you can easily adjust
your links.
Note: Peel protective paper off all Lexan before use (if
there is any)
Note: Milling artifacts can be removed by scraping carefully
along the edges with a fingernail or an Exacto knife.
Note: Edges can be sanded with 220 grit sand paper if there
are rough edges or burrs.
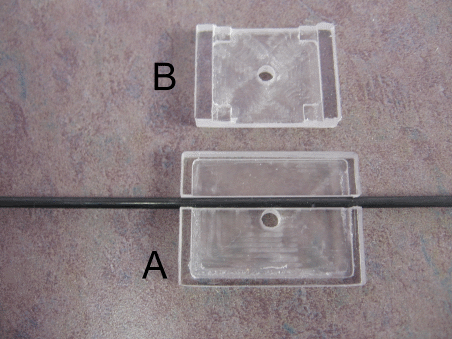
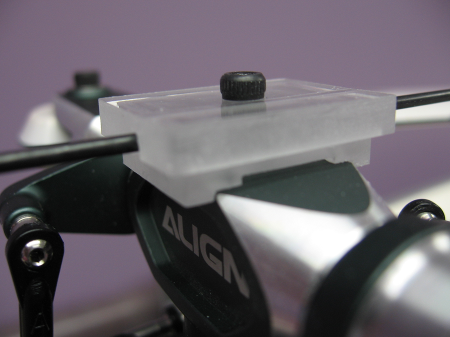
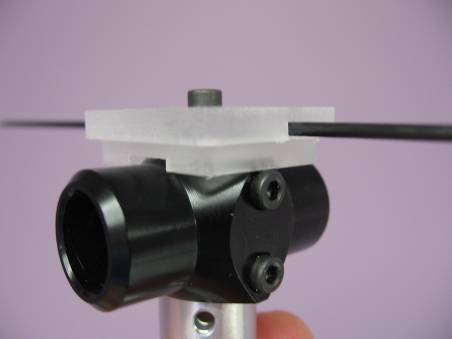
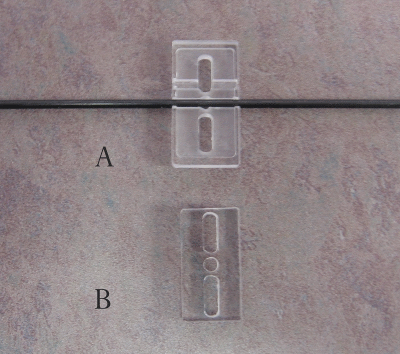
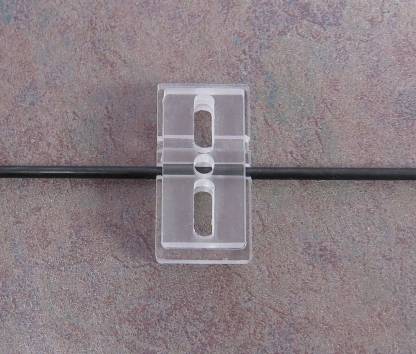
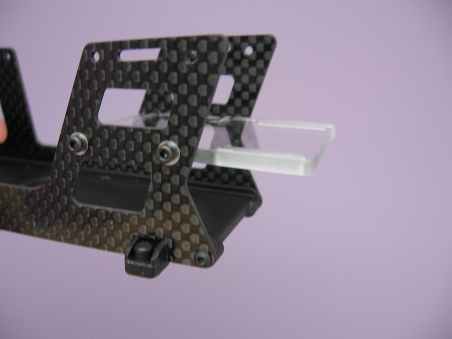
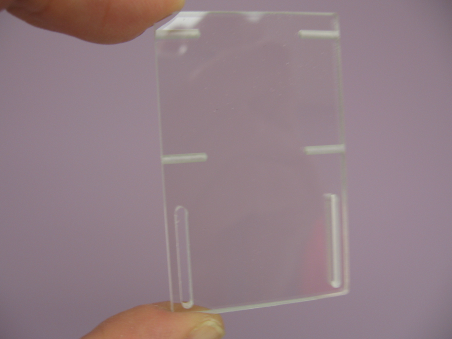
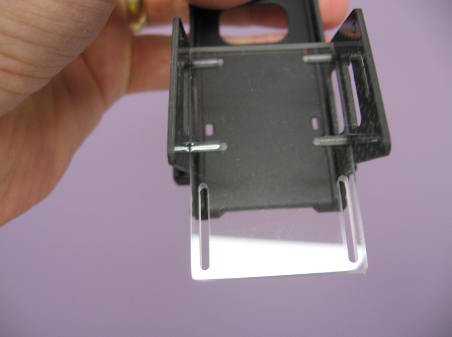
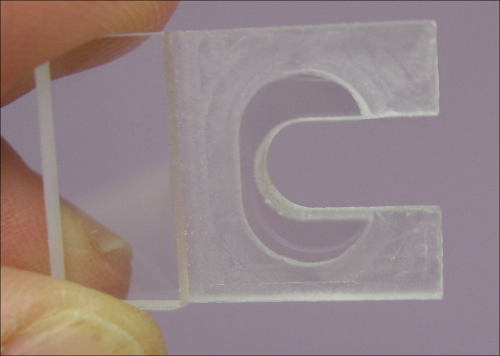
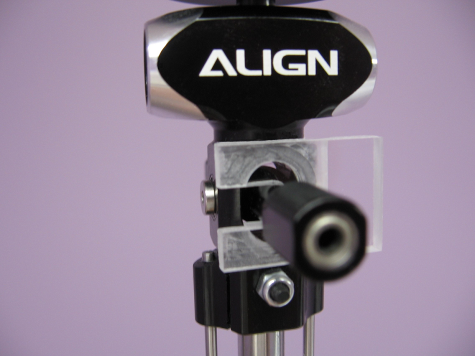
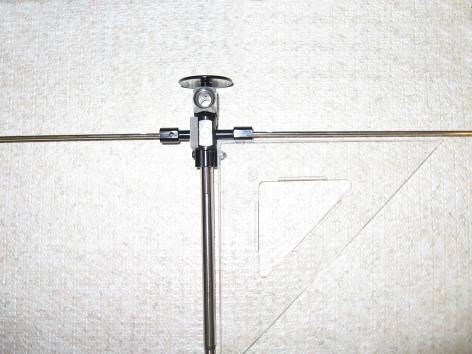
TREX 500
FBL Pitch Alignment Tool
This tool mounts on top the head to provide a level reference
for your pitch gauge to allow accurate blade pitch adjustments on
Flybarless heads. A TREX 450 Flybar is used as reference bar (not
included). Lexan tool won�t scratch your paint.
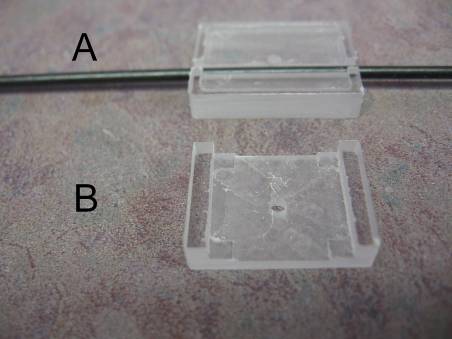
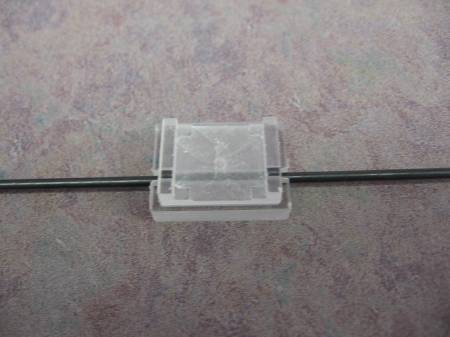
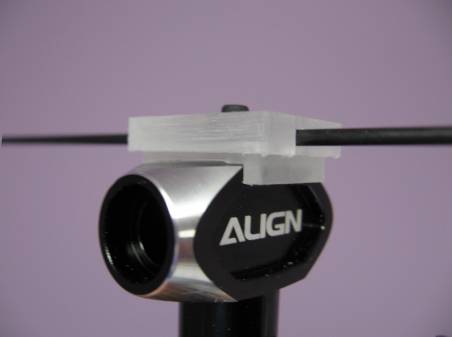
Center a 450 flybar (not included) into the slotted top piece
(Part A). Place the head mount (Part B) over the flybar and top piece
(Part B), feet side up. Mount the assembly onto the head assuring the feet
rest evenly as shown. Screw gently into place with the head button screw
(not included). Over tightening will damage
part. Now your pitch gauge can be sighted
along the 450 flybar.
Note: Peel protective paper off all Lexan before use (if
there is any)
Note: Milling artifacts can be removed by scraping carefully
along the edges with a fingernail an Exacto knife.
Note: Edges can be sanded with 220 grit
sand paper if there are rough edges or burrs.
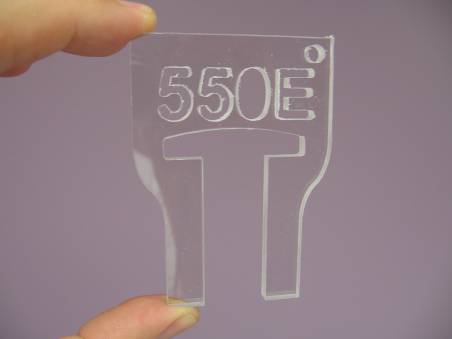
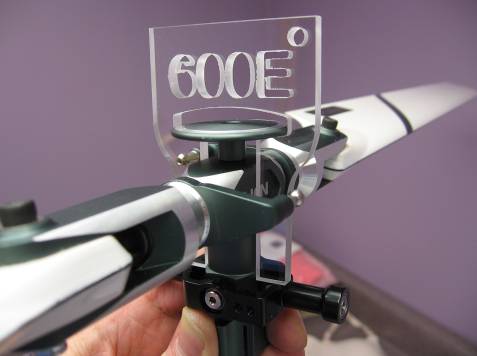
TREX 600
FBL Pitch Alignment Tool
This tool mounts on top the head to provide a level reference
for your pitch gauge to allow accurate blade pitch adjustments on
Flybarless heads. A TREX 450 Flybar is used as reference bar (not
included). Lexan tool won�t scratch your paint.

Center a 450 flybar (not included) into the slotted top piece
(Part A). Place the head mount (Part B) over the flybar and top piece
(Part B), feet side up. Mount the assembly onto the head assuring the feet
rest evenly as shown. Screw into place with the head button screw (not
included). Now you pitch gauge can be sighted along the 450 flybar.
Note: Peel protective paper off all Lexan before use (if
there is any)
Note: Milling artifacts can be removed by scraping carefully
along the edges with a fingernail an Exacto knife.
Note: Edges can be sanded with 220 grit
sand paper if there are rough edges or burrs. .
Logo FBL
Pitch Alignment Tool
This tool mounts on top the head to provide a level reference
for your pitch gauge to allow accurate blade pitch adjustments on
Flybarless heads. A TREX 450 Flybar is used as reference bar (not
included). Lexan tool won�t scratch your paint.


Center a 450 flybar (not included) into the slotted top piece
(Part A). Place the head mount (Part B) over the flybar and top piece
(Part B), feet side up. Mount the assembly onto the head assuring the feet
rest evenly as shown. Screw gently into place with the head button screw
(not included). Over tightening will damage
part. Now your pitch gauge can be sighted
along the 450 flybar.
Note: Peel protective paper off all Lexan before use (if
there is any)
Note: Milling artifacts can be removed by scraping carefully
along the edges with a fingernail an Exacto knife.
Note: Edges can be sanded with 220 grit sand paper if there
are rough edges or burrs.
Compass
6HV FBL Pitch Alignment Tool
This tool mounts on top the head to provide a level reference
for your pitch gauge to allow accurate blade pitch adjustments on
Flybarless heads. A TREX 450 Flybar is used as reference bar (not
included). Lexan tool won�t scratch your paint.
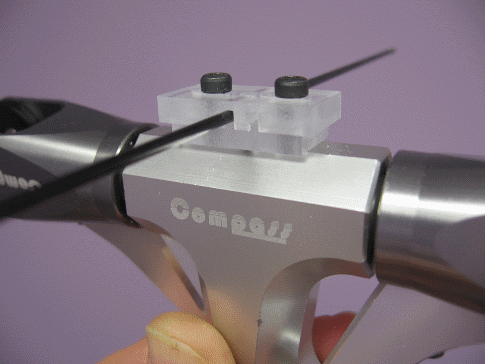
Center a 450 flybar (not included) into the slotted top piece
(Part A). Place the head mount (Part B) over the flybar and top piece
(Part A). Mount the assembly onto the head. Screw gently into place with
the head button screws (not included). Over
tightening will damage part. Now your pitch
gauge can be sighted along the 450 flybar.
Note: Peel protective paper off all Lexan before use (if
there is any)
Note: Milling artifacts can be removed by scraping carefully
along the edges with a fingernail or an Exacto knife.
Note: Edges can be sanded with 220 grit sand paper if there
are rough edges or burrs.
TREX 450
Sport Gyro/Receiver Mount
This mount provides an additional rigid mounting surface for
your gyro, receiver, or both.
Be very careful that all is secure. A safety strap of some
kind is recommended for added security. Losing a gyro mid flight will make
for a very challenging landing and could be dangerous!
Note: Peel protective paper off all Lexan before use (if
there is any)
Note: Edges can be sanded with 220 grit sand paper if the fit
is too tight or if there are rough edges or burrs.
Note: Clean any machine oil off the screws before
installation
Note: For additional security, add a touch of CA when installing the
screws (Optional)
Note: Reverse the �Dir� switch on your gyro if
inverting it or spinning will occur.
TREX 500
Gyro/Receiver Mount
This mount provides an additional rigid mounting surface for
your gyro, receiver, or both. (Inspired by ChasHeliCop)

Be very careful that all is secure. A safety strap of some
kind is recommended for added security. Losing a gyro mid flight will make
for a very challenging landing and could be dangerous!
Note: Peel protective paper off all Lexan before use (if
there is any)
Note: Edges can be sanded with 220 grit sand paper if the fit
is too tight or if there are rough edges or burrs.
Note: Clean any machine oil off the screws before
installation
Note: For additional security, add a touch of CA when installing the
screws (Optional)
Note: Reverse the �Dir� switch on your gyro if
inverting it or spinning will occur.
TREX 500
VBAR Mount
This mount provides an additional rigid mounting surface for
your VBAR, gyro, receiver, or both. (Inspired by Steven Bales)
Be very careful that all is secure. A safety strap of some
kind is recommended for added security. Losing a component mid flight will
make for a very challenging landing and could be dangerous!
Note: Peel protective paper off all Lexan before use (if
there is any)
Note: Edges can be sanded with 220 grit sand paper if the fit
is too tight or if there are rough edges or burrs.
Note: Clean any machine oil off the screws before
installation
Note: For additional security, add a touch of CA when installing the
screws (Optional)
Note: Reverse the �Dir� switch on your gyro if
inverting it or spinning will occur.
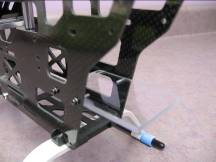
Rush 750
Satellite Receiver Mounts
Light weight non-conductive mounting surfaces that allow
optimum placement of your satellite receiver units.
Rear Unit: Mount using stock screws from boom mount assembly.
Unit can be rotated to provide a shorter or longer mount. Longer mount is
recommended for better isolation from conductive surfaces.
Front Unit: Mount using provided nylon ties. Prior to
installation, insert nylon ties from back through upper slots then loop
back through lower slots. Start tie end around heli metal spacer and
through the nylon locks then snap mount into place. Finish by tightening
locks then trim excess nylon. Mount Satellite Receiver with your adhesive
of choice (not provided). Center the antennas for optimum placement.
Note: Peel protective paper off all Lexan before use (if
there is any)
Note: Milling artifacts can be removed by scraping carefully
along the edges with a fingernail, Exacto knife or 220 sand paper.
mCP X
3-n-1 Mount (for Controller Module)
This mount provides a light weight, vibration isolated, rigid
mounting surface for your Flybarless 3-n-1 Control Unit.
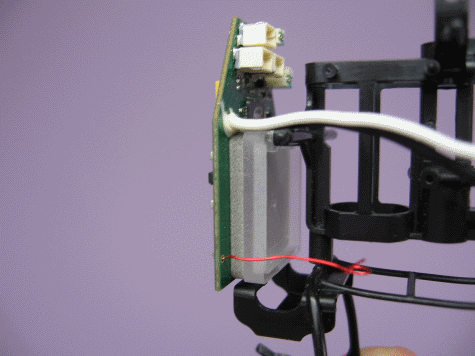
Assure all servo wires are loose enough to move the 3-n-1
board forward at least an eighth of an inch. You may have to re-route the
wires from your rear servo just a little. Assure all 3-n-1 connectors are
glued in tightly. Slip the slots in the back side of the mount over the
mounting tubes for the 3-n-1 board. Use the 3-n-1 stock mounting screws
with a dab of CA on the threads to secure the mount to the tubes.
Carefully place a square of medium thickness gyro mounting foam (not
included) over the smooth side of the mount. Firmly and slowly squeeze the
foam against the mount for about 10 seconds to get a solid bond. Carefully
center and stick your 3-n-1 unit onto the new mount making sure the bottom
of the 3-n-1 board lines up with the bottom of the mount to assure proper
canopy fit above the board. Again, firmly and slowly squeeze the foam
against the 3-n-1 for about 10 seconds to assure no gaps and a solid bond.
Note: Peel protective paper off all Lexan before use (if
there is any)
Note: Milling artifacts can be removed by scraping carefully
along the edges with a fingernail, Exacto knife or 220 sand paper.
Ultimate
TREX 500 Gyro Mount
This mount provides rigid mounting surface for your gyro.
(Designed by BobOD)
Be very careful that all is secure. A safety strap of some
kind is recommended for added security. Losing a gyro mid flight will make
for a very challenging landing and could be dangerous!
Note: Peel protective paper off all Lexan before use (if
there is any)
Note: Edges can be sanded with 220 grit sand paper if the fit
is too tight or if there are rough edges or burrs.
Note: Reverse the �Dir� switch on your gyro if
inverting it or spinning will occur.
Ultimate
TREX 550E/600E Gyro Mount
This mount provides rigid mounting surface for your gyro.
(Designed by BobOD)
Be very careful that all is secure. A safety strap of some
kind is recommended for added security. Losing a gyro mid flight will make
for a very challenging landing and could be dangerous!
Note: Peel protective paper off all Lexan before use (if
there is any)
Note: Edges can be sanded with 220 grit sand paper if the fit
is too tight or if there are rough edges or burrs.
Note: Reverse the �Dir� switch on your gyro if
inverting it or spinning will occur.
Ultimate
TREX 550N/600N Gyro Mount
This mount provides rigid mounting surface for your gyro.
(Designed by BobOD)
Be very careful that all is secure. A safety strap of some
kind is recommended for added security. Losing a gyro mid flight will make
for a very challenging landing and could be dangerous!
Note: Peel protective paper off all Lexan before use (if
there is any)
Note: Edges can be sanded with 220 grit sand paper if the fit
is too tight or if there are rough edges or burrs.
Note: Reverse the �Dir� switch on your gyro if
inverting it or spinning will occur.
TREX 600
Gyro/Receiver Mount
This mount provides an additional rigid mounting surface for
your gyro, receiver, or both.
Be very careful that all is secure. A safety strap of some
kind is recommended for added security. Losing a gyro mid flight will make
for a very challenging landing and could be dangerous!
Note: Peel protective paper off all Lexan before use (if
there is any)
Note: Edges can be sanded with 220 grit sand paper if the fit
is too tight or if there are rough edges or burrs.
Note: Clean any machine oil off the screws before
installation
Note: For additional security, add a touch of CA when installing the
screws (Optional)
Note: Reverse the �Dir� switch on your gyro if
inverting it or spinning will occur.
TREX 600
VBAR Mount
This mount provides an additional rigid mounting surface for
your VBAR, gyro, receiver, or both. (Inspired by Tony DeCrosta)
Be very careful that all is secure. A safety strap of some
kind is recommended for added security. Losing a component mid flight will
make for a very challenging landing and could be dangerous!
Note: Peel protective paper off all Lexan before use (if
there is any)
Note: Edges can be sanded with 220 grit sand paper if the fit
is too tight or if there are rough edges or burrs.
Note: Clean any machine oil off the screws before
installation
Note: For additional security, add a touch of CA when installing the
screws (Optional)
Note: Reverse the �Dir� switch on your gyro if
inverting it or spinning will occur.
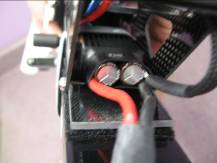
TREX 450
Battery Mount
This mount provides a strong flexible mounting surface for
your battery. (Inspired by copterklutz)
Mount in place of stock battery tray. Use stock screws to
mount. Once you place Velcro on top for your battery it will raise the
mounting surface to the height of the frame edges. Be very careful placing
Velcro because it sticks very well to the Lexan!
Note: Peel protective paper off all Lexan before use (if
there is any)
Note: Edges can be sanded with 220 grit sand paper if the fit
is too tight or if there are rough edges or burrs.
Note: Clean any machine oil off the screws before
installation
Note: For additional security, add a touch of CA when installing the
screws (Optional)
TREX 500
Battery Mount
This mount provides a rigid mounting surface for both your
battery and ESC. Mounting hardware included (Inspired by chuckk)
Mount in place of stock battery tray. Use stock silver bling
and canopy standoffs. Put Velcro on top for your battery and Velcro
underneath for your ESC. Be very careful placing Velcro because it sticks
very well to the Lexan!
Note: Peel protective paper off all Lexan before use (if
there is any)
Note: Edges can be sanded with 220 grit sand paper if the fit
is too tight or if there are rough edges or burrs.
Note: Clean any machine oil off the screws before
installation
Note: For additional security, add a touch of CA when
installing the screws (Optional)
Inverted
Gyro Mount (The Thingy)
Its intent is to allow you to
securely mount the gyro underneath the boom so as to avoid damage to the
gyro by an out of control flybar or blade if you crash. Mounts are
available for the TREX SE, XL, SA, SuperFrame, and Mini-Titan.
SE Inverted Mount XL Inverted Mount
SuperFrame Mount SA Inverted Mount Mini-Titan Mount
There are 4 main approaches to
mounting the Inverted Gyro Mount:
- Glue the Inverted Gyro
Mount in place. (SA, SE, XL & SuperFrame mounts)
Use Plumbers Goop to secure. Adhere
to as many surfaces as possible to give the best grip. Avoid getting goop
on the boom since you will want to adjust it periodically.
- Screw it into the boom
block through the bottom of the Inverted Gyro Mount. (SE mount
only)
This method requires you to drill
one hole through the boom block, and then tap the hole with a 3mm .50
pitch tap. Press the block into place and use it as a template to drill a
#40 hole. Only drill through the first layer of metal which is only a few
mm thick. Carefully tap the hole with a 3 mm .50 pitch tap. Use loctite on
screw when installing. Make it snug but do not over tighten or you could
break the bond between the inner block and the top block. You don�t want
to strip the hole or damage the Inverted Gyro Mount.
I will drill the countersunk hole
in the Inverted Gyro Mount and provide a 3mm stainless steel mounting
screw if requested when ordering.
- Screw into the Inverted
Gyro Mount from both sides through the frame. (SE & SuperFrame mounts )
This method requires you drill a
hole through your frames on each side. Screws will go through your frames
into the small block on the Inverted Gyro Mount. Drill the frames first.
Locate the new holes directly between the two existing holes. Use a bit
that matches the other holes in the frame.
Press the mount into place, and then
use the frame holes to drill smaller holes into the small block on the
mount. Use a bit sized appropriately for your screws. Drill very slowly
making sure to keep the drill perpendicular to the frame. Drill a separate
hole for each side, rather than one hole clear through the block.
- Stick on the Inverted
Gyro Mount with double sided tape. (All mounts )
Use a thin 1/16�heavy duty double
sided mounting tape like Scotch� Exterior Mounting Tape. Don�t use the
1/8� spongy type that comes with your gyro to mount the Gyro Mount because
it will make the gyro response a bit mushy.
Whatever method you choose, be very careful that all is
secure. A safety strap of some kind is recommended for added security.
Losing a gyro mid flight will make for a very challenging landing and
could be dangerous!
Note: Peel protective paper off all Lexan before use (if
there is any)
Note: Edges can be sanded with 220 grit sand paper if the fit
is too tight or if there are rough edges or burrs.
Note: If one clear edge is longer than the other, place the
longer end out to make sure there is plenty of room to mount the gyro.
Note: Reverse the �Dir� switch on your gyro if moving
it from the top to down under or spinning will occur.
Gaui 200
Gyro/Receiver Mount
This mount provides an additional rigid mounting surface for
your gyro, receiver, or both. (Inspired by BuzzKill)
Be very careful that all is secure. A safety strap of some
kind is recommended for added security. Losing a gyro mid flight will make
for a very challenging landing and could be dangerous!
Note: Peel protective paper off all Lexan before use (if
there is any)
Note: Edges can be sanded with 220 grit sand paper if the fit
is too tight or if there are rough edges or burrs.
Note: A little soap on the threads will make it easier to
turn in the screws. They are purposely tight.
Note: Reverse the �Dir� switch on your gyro if
inverting it or spinning will occur.
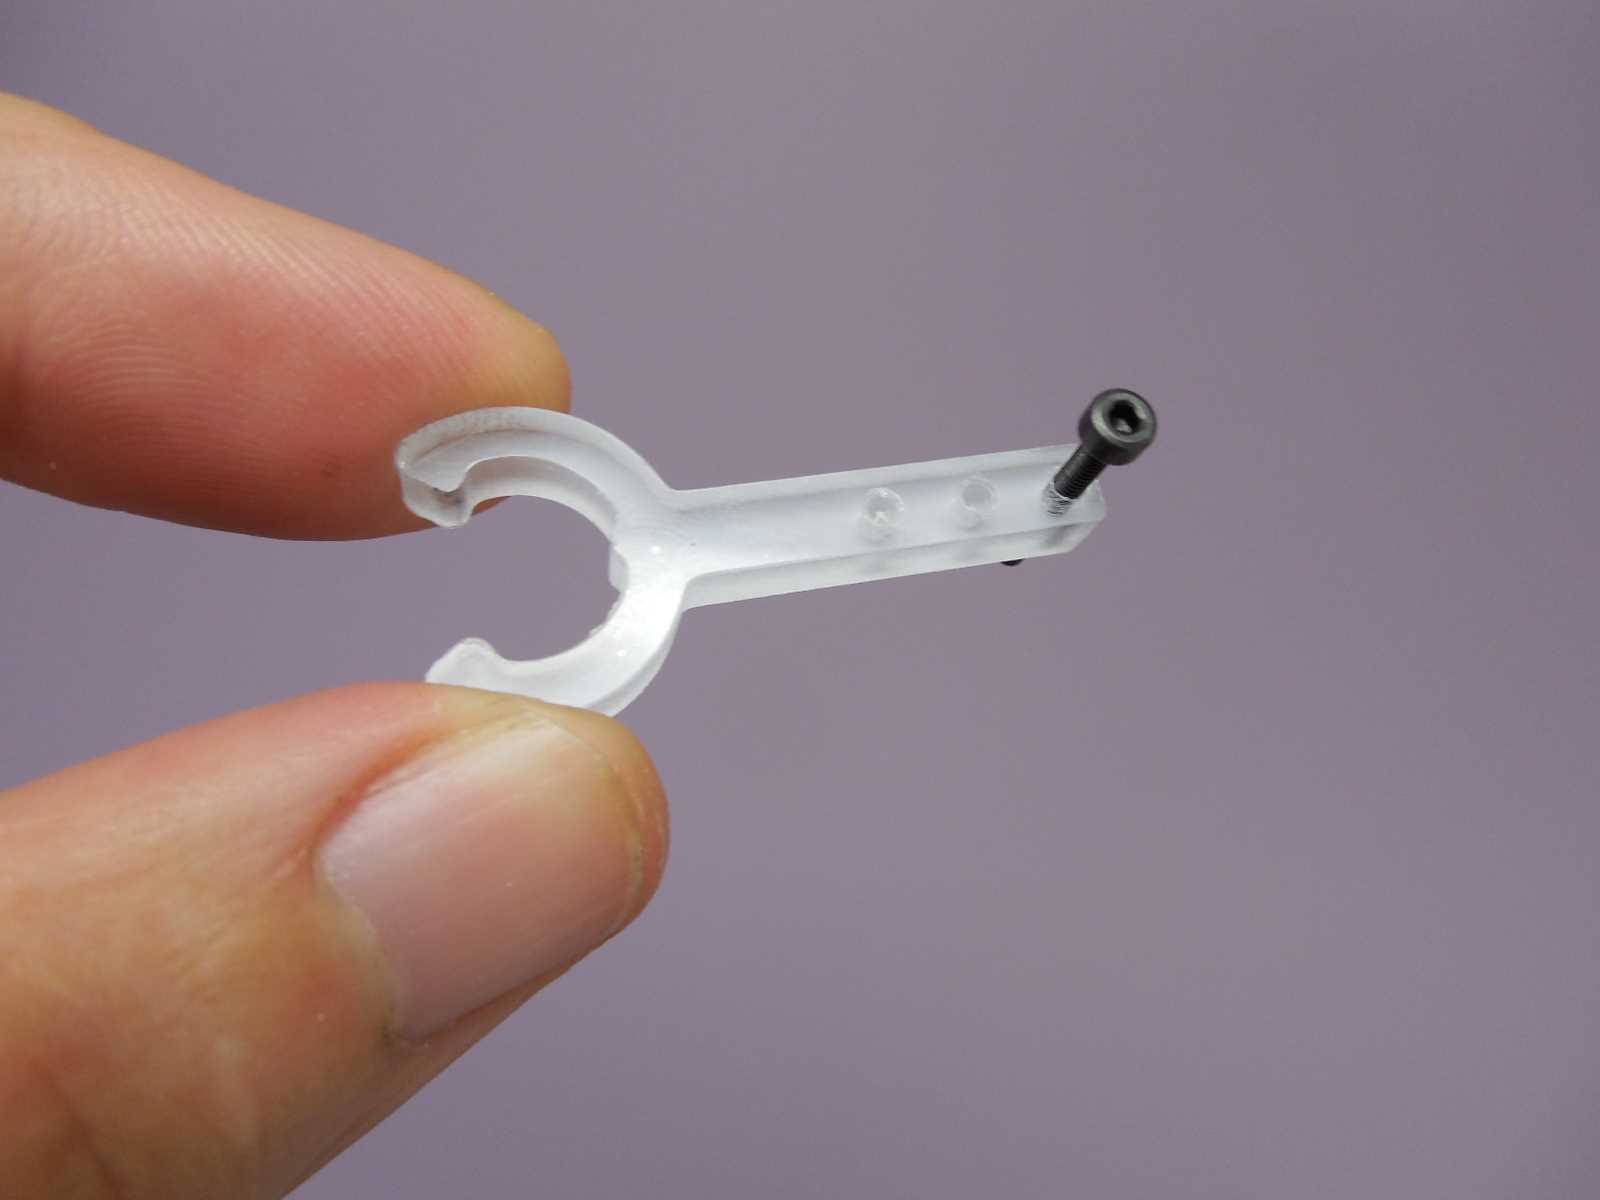
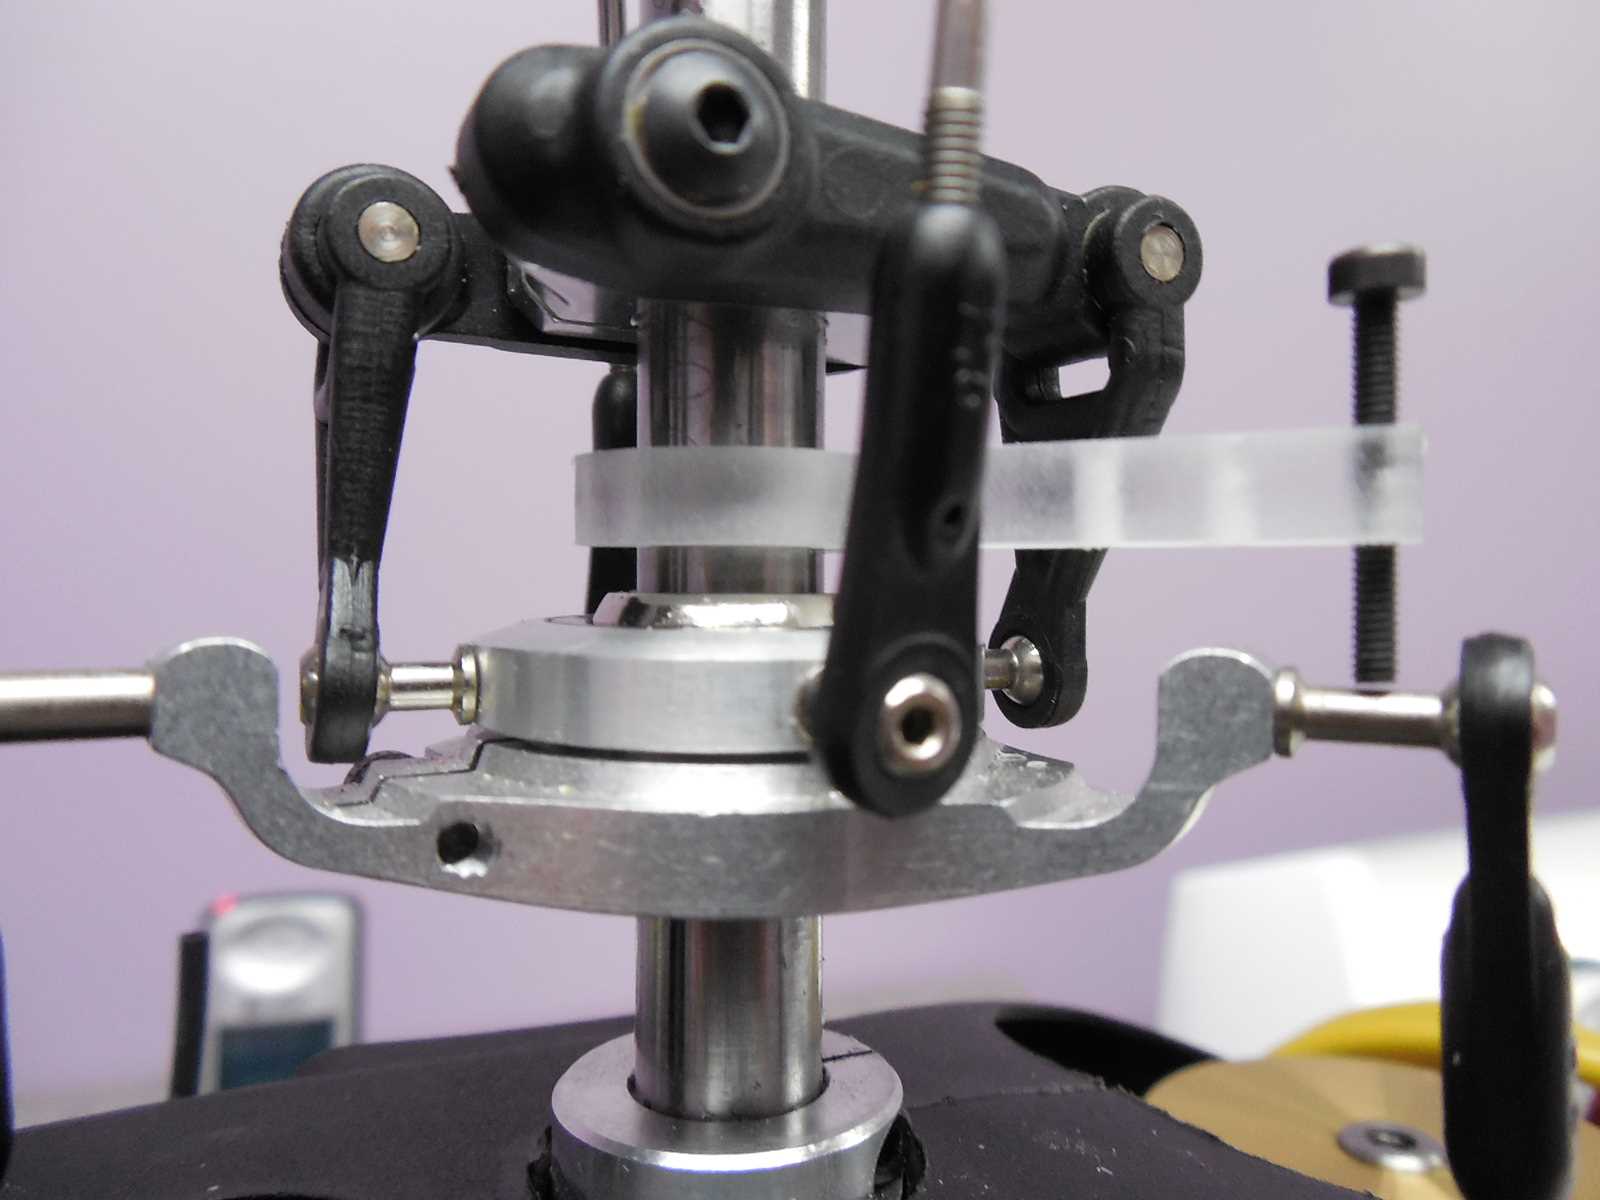
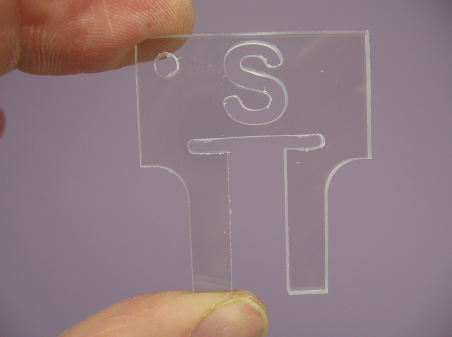
TREX 250
Flybar Lock
This tool locks your flybar firmly in place while you adjust
your pitch ranges. Lexan tool won�t scratch your paint.
Adjust your head to move the link down out of the way on the
side you are installing the lock on. Install the Flybar Lock by sliding it
in from the side down to touch the seesaw on both sides of the Main Rotor
Housing. Then slide the top over the head button to secure in place.
Remember to remove when adjustments are complete.
Note: Peel protective paper off all Lexan before use (if
there is any)
Note: Edges can be sanded or filed if the fit is too tight or
if there are burrs on the edges
TREX 450
Plastic Flybar Lock
This tool locks your flybar firmly in place while you adjust
your pitch ranges. Lexan tool won�t scratch your paint.
Adjust your head to mid stick with the levers all parallel.
Install the Flybar Lock by sliding it in from the side down to touch the
seesaw on both sides of the Main Rotor Housing. Then slide the top over
the head button to secure in place.
Assure it is centered between the linkages so that they all
move freely. Adjust pitch back to mid stick to remove when adjustments are
complete.
Note: Peel protective paper off all Lexan before use (if
there is any)
Note: Edges can be sanded or filed if the
fit is too tight or if there are burrs on the edges
TREX 450
V1 Flybar Lock
This tool locks your flybar firmly in place while you adjust
your pitch ranges. This tool will not work on late model V1s with the V2
style button. Lexan tool won�t scratch your paint.
Adjust your head to mid stick with the levers all parallel.
Install the Flybar Lock by sliding it in from the side down to touch the
seesaw on both sides of the Main Rotor Housing. Then slide the top over
the head button to secure in place.
Assure it is centered between the linkages so that they all
move freely. Adjust pitch back to mid stick to remove when adjustments are
complete.
Note: Peel protective paper off all Lexan before use (if
there is any)
Note: Edges can be sanded or filed if the
fit is too tight or if there are burrs on the edges
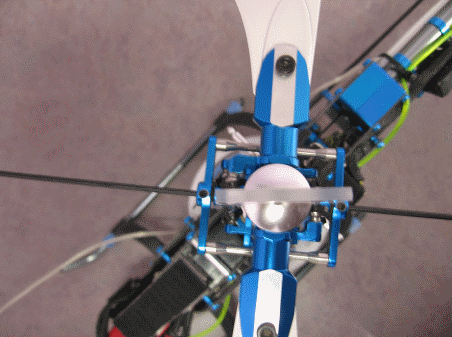
TREX 450
V2 Flybar Lock
This tool locks your flybar firmly in place while you adjust
your pitch ranges. This tool also works on the late version V1 with the V2
style button. Lexan tool won�t scratch your paint.
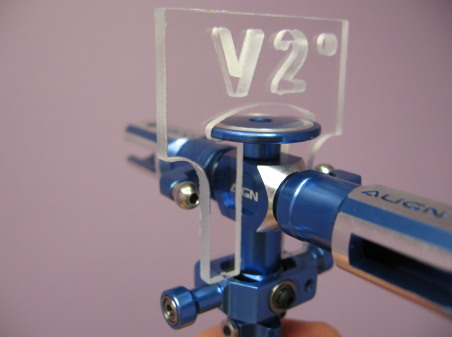
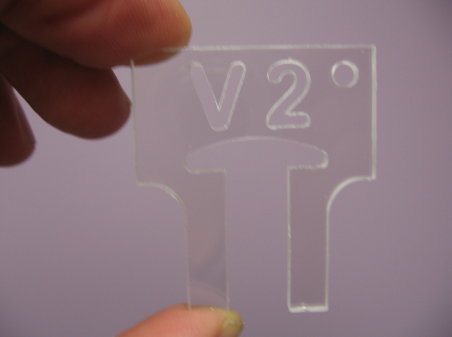
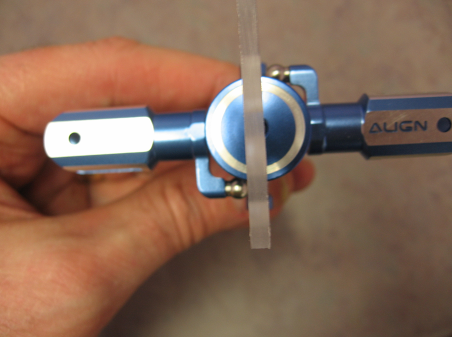
Adjust your head to move the link down out of the way on the
side you are installing the lock on. Install the Flybar Lock by sliding it
in from the side down to touch the seesaw on both sides of the Main Rotor
Housing. Then slide the top over the head button to secure in place.
Remember to remove when adjustments are complete.
Note: Peel protective paper off all Lexan before use (if
there is any)
Note: Edges can be sanded or filed if the fit is too tight or
if there are burrs on the edges
TREX 450
Sport Flybar Lock
This tool locks your flybar firmly in place while you adjust
your pitch ranges. Lexan tool won�t scratch your paint.

Adjust your head to move the link down out of the way on the
side you are installing the lock on. Install the Flybar Lock by sliding it
in from the side down to touch the seesaw on both sides of the Main Rotor
Housing. Then slide the top over the seesaw to secure in place. Remember
to remove when adjustments are complete.
Note: Peel protective paper off all Lexan before use (if
there is any)
Note: Edges can be sanded or filed if the fit is too tight or
if there are burrs on the edges
TREX 450
Pro Flybar Lock
This tool locks your flybar firmly in place while you adjust
your pitch ranges. Lexan tool won�t scratch your paint.
Adjust your head to move the link down out of the way on the
side you are installing the lock on. Install the Flybar Lock by sliding it
in from the side down to touch the seesaw on both sides of the Main Rotor
Housing. Then slide the top over the head button to secure in place.
Remember to remove when adjustments are complete.
Note: Peel protective paper off all Lexan before use (if
there is any)
Note: Edges can be sanded or filed if the fit is too tight or
if there are burrs on the edges
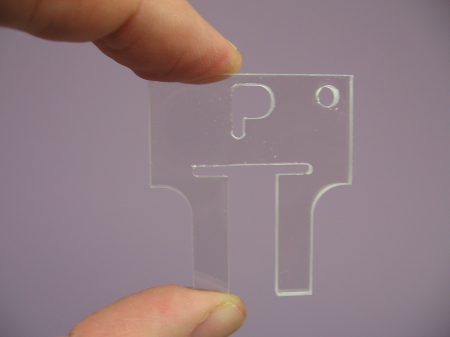
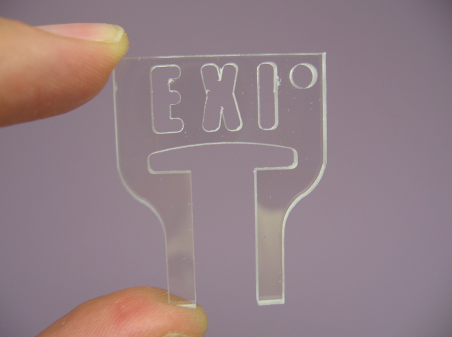
EXI 450
Flybar Lock
This tool locks your flybar firmly in place while you adjust
your pitch ranges. Lexan tool won�t scratch your paint.
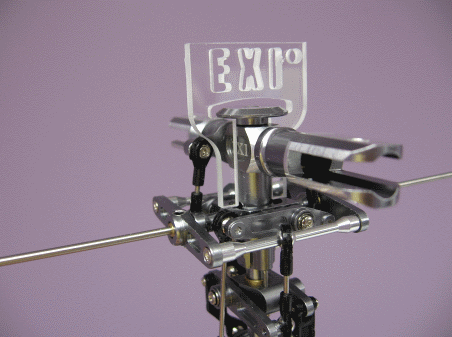
Adjust your head to mid stick with the levers all parallel.
Install the Flybar Lock by sliding it in from the side down to touch the
seesaw on both sides of the Main Rotor Housing. Then slide the top over
the head button to secure in place.
Assure it is centered between the linkages so that they all
move freely. Adjust pitch back to mid stick to remove when adjustments are
complete.
Note: Peel protective paper off all Lexan before use (if
there is any)
Note: Edges can be sanded or filed if the
fit is too tight or if there are burrs on the edges
Adjustable
450 Flybar Lock
This tool locks your flybar firmly in place while you adjust
your pitch ranges. It is adjustable to fit TREX 450 series and similar
heads. Adjust it for your 450 head making it snug without flexing the
legs. Lexan tool won�t scratch your paint.

Adjust your head to move the link down out of the way on the
side you are installing the lock on. Install the Flybar Lock by sliding it
in from the side down to touch the seesaw on both sides of the Main Rotor
Housing. Move the slider down to a spot that allows it to be slipped over
the button. Then move the slider up under the button till the lock is
secure and gently snug up the screws. Remove the lock and loosen one screw
at a time while shifting the slider up just a hair and snugging the screw
back up. Try the lock on the head again and repeat until the lock produces
a solid lock but is not hard to install and remove. Assure both sides are
even.
Note: Peel protective paper off all Lexan before use (if
there is any)
Note: Edges can be sanded or filed if the fit is too tight or
if there are burrs on the edges
Adjustable
500 Flybar Lock (Fits TREX 500 series and similar heads)
This tool locks your flybar firmly in place while you adjust
your pitch ranges. It is adjustable to fit TREX 500 series and similar
heads. Adjust it for your 450 head making it snug without flexing the
legs. Lexan tool won�t scratch your paint.
Adjust your head to move the link down out of the way on the
side you are installing the lock on. Install the Flybar Lock by sliding it
in from the side down to touch the seesaw on both sides of the Main Rotor
Housing. Move the slider down to a spot that allows it to be slipped over
the button. Then move the slider up under the button till the lock is
secure and gently snug up the screws. Remove the lock and loosen one screw
at a time while shifting the slider up just a hair and snugging the screw
back up. Try the lock on the head again and repeat until the lock produces
a solid lock but is not hard to install and remove. Assure both sides are
even.
Note: Peel protective paper off all Lexan before use (if
there is any)
Note: Edges can be sanded or filed if the fit is too tight or
if there are burrs on the edges
TREX 500
Flybar Lock (fits heads with plastic seesaw)
This tool locks your flybar firmly in place while you adjust
your pitch ranges. Lexan tool won�t scratch your paint.

Adjust your head to move the link down out of the way on the
side you are installing the lock on. Install the Flybar Lock by sliding it
in from the side down to touch the seesaw on both sides of the Main Rotor
Housing. Then slide the top over the head button to secure in place.
Remember to remove when adjustments are complete.
Note: Peel protective paper off all Lexan before use (if
there is any)
Note: Edges can be sanded or filed if the fit is too tight or
if there are burrs on the edges
TREX 500
ESP Flybar Lock (fits heads with the metal seesaw)
This tool locks your flybar firmly in place while you adjust
your pitch ranges. Lexan tool won�t scratch your paint.
Adjust your head to move the link down out of the way on the
side you are installing the lock on. Install the Flybar Lock by sliding it
in from the side down to touch the seesaw on both sides of the Main Rotor
Housing. Then slide the top over the head button to secure in place.
Remember to remove when adjustments are complete.
Note: Peel protective paper off all Lexan before use (if
there is any)
Note: Edges can be sanded or filed if the fit is too tight or
if there are burrs on the edges
TREX
500E Pro Flybar Lock
This tool locks your flybar firmly in place while you adjust
your pitch ranges. Lexan tool won�t scratch your paint.
Tilt your see saw down on one side then center your flybar
and slip the lock into place as shown. Push in till flush. Remember to
remove when adjustments are complete. Rock the tool back and forth to
remove. Removal gets easier as the tool breaks in. Apply a bit of oil to
contact surfaces if installation/removal is too difficult.
Note: Peel protective paper off all Lexan before use (if
there is any)
Note: Edges can be sanded or filed if the fit is too tight or
if there are burrs on the edges
TREX 550
ESP Flybar Lock
This tool locks your flybar firmly in place while you adjust
your pitch ranges. Lexan tool won�t scratch your paint.
Adjust your head to move the link down out of the way on the
side you are installing the lock on. Install the Flybar Lock by sliding it
in from the side down to touch the seesaw on both sides of the Main Rotor
Housing. Then slide the top over the head button to secure in place.
Remember to remove when adjustments are complete.
Note: Peel protective paper off all Lexan before use (if
there is any)
Note: Edges can be sanded or filed if the fit is too tight or
if there are burrs on the edges
Outrage
550 Flybar Lock
This tool locks your flybar firmly in place while you adjust
your pitch ranges. Lexan tool won�t scratch your paint.


Tilt your flybar and slip the half moon lock piece into one
side as shown. Now, flip the head over and swing the flybar to 90 degrees
against the previously inserted lock. Insert the second half moon lock
piece into the opposite side. Now slide the latch over both to squeeze
them together. Remember to remove when adjustments are complete.
Note: Peel protective paper off all Lexan before use (if
there is any)
Note: Edges can be sanded or filed if the fit is too tight or
if there are burrs on the edges
Gaui X5
Flybar Lock
This tool locks your flybar firmly in place while you adjust
your pitch ranges. Lexan tool won�t scratch your paint.
Tilt your see saw down on one side then center your flybar
and slip the lock into place as shown. Push in till flush. Remember to
remove when adjustments are complete.
Note: Peel protective paper off all Lexan before use (if
there is any)
Note: Edges can be sanded or filed if the fit is too tight or
if there are burrs on the edges
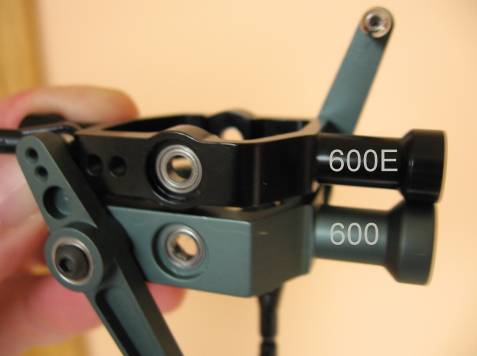
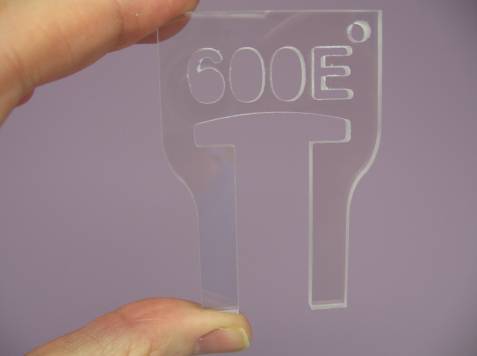
TREX 600
Flybar Lock (fits original plastic and original metal seesaws)
This tool locks your flybar firmly in place while you adjust
your pitch ranges. Lexan tool won�t scratch your paint.
(Get 600E version for 600 ESP helis with lighter seesaw like
black seesaw in far right picture.)
Adjust your head to move the link down out of the way on the
side you are installing the lock on. Install the Flybar Lock by sliding it
in from the side down to touch the seesaw on both sides of the Main Rotor
Housing. Then slide the top over the head button to secure in place.
Remember to remove when adjustments are complete.
Note: Peel protective paper off all Lexan before use (if
there is any)
Note: Edges can be sanded or filed if the fit is too tight or
if there are burrs on the edges
TREX 600
ESP Flybar Lock (fits latest lighter metal seesaws)
This tool locks your flybar firmly in place while you adjust
your pitch ranges. Lexan tool won�t scratch your paint.
(Get 600 version for 600 helis with plastic or original metal
seesaw like green seesaw in far right picture.)
Adjust your head to move the link down out of the way on the
side you are installing the lock on. Install the Flybar Lock by sliding it
in from the side down to touch the seesaw on both sides of the Main Rotor
Housing. Then slide the top over the head button to secure in place.
Remember to remove when adjustments are complete.
Note: Peel protective paper off all Lexan before use (if
there is any)
Note: Edges can be sanded or filed if the fit is too tight or
if there are burrs on the edges
TREX 700
Flybar Lock
This tool locks your flybar firmly in place while you adjust
your pitch ranges. Lexan tool won�t scratch your paint.
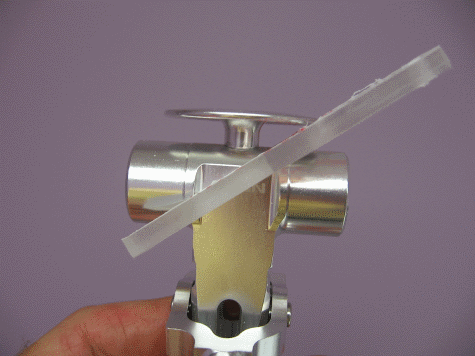
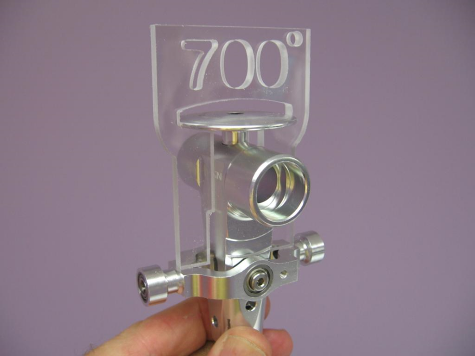
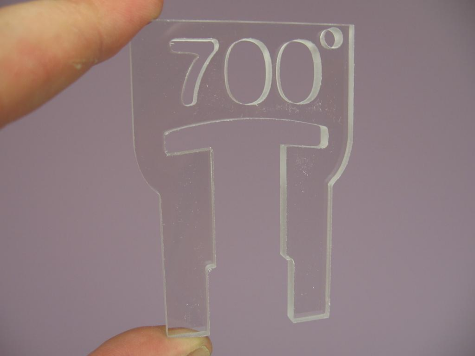
Adjust your head to move the link down out of the way on the
side you are installing the lock on. Install the Flybar Lock by sliding it
in from the side between the button and the Main Rotor Housing (as shown
in first picture). Then slide it upright over the button to lock in place
between the button and the seesaw. Remember to remove when adjustments are
complete.
Note: Peel protective paper off all Lexan before use (if
there is any)
Note: Edges can be sanded or filed if the fit is too tight or
if there are burrs on the edges
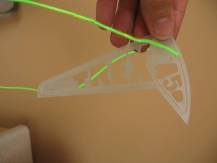
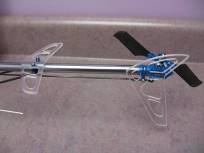
TREX 450
Night Fins (1 Horizontal and 1 Vertical)
Make it easy to see the orientation of your night heli with
these high quality Lexan fins specially designed to make the most of cold
light strings. (Light strings and mounting hardware not included)

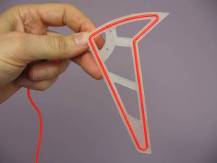

Thread the light string through the hole from back to front.
Leave plenty of slack to inlay the string. Start inlaying the string into
the slot placing the end next to the hole, and then progressively press
into the slot ending up back by the hole. Pull the excess string through
the hole. Use the handle of a screw driver on a hard surface to gently
press in string on corners. Use tiny drops of glue in slot to secure if
necessary. Use TREX screw bling or a washer when installing to avoid
stressing holes. Use loc-tite and just snug up screws. Over tightening
will damage fins.
Note: Drill additional 3/32� holes in slot if desired.
Note: A belt sander with 120 grit paper
can be used to touch up burnishing if necessary
TREX 450
Night Fins w/Slotted Text (1 Horizontal and 1 Vertical)
Make it easy to see the orientation of your night heli with
these high quality Lexan fins specially designed to make the most of cold
light strings. (Light strings and mounting hardware not included)
Thread the light string through the hole from back to front.
Leave plenty of slack to inlay the string. Start inlaying the string into
the slot placing the end next to the hole, and then progressively press
into the slot ending up back by the hole. Pull the excess string through
the hole. Use the handle of a screw driver on a hard surface to gently
press in string on corners. Use tiny drops of glue in slot to secure if
necessary. Use TREX screw bling or a washer when installing to avoid
stressing holes. Use loc-tite and just snug up screws. Over tightening
will damage fins.
Note: Drill additional 3/32� holes in slot if desired.
Note: A belt sander with 120 grit paper
can be used to touch up burnishing if necessary
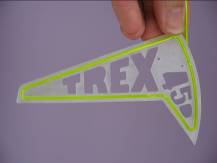
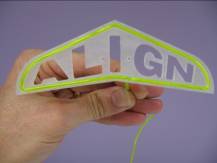
Slotted Finless Fins & 3D Fins
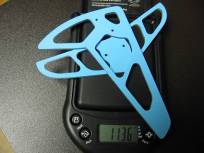
Stop replacing those stock fins on
the simplest crashes!
These fins are much more durable
than the stock fins and they look great. They survive most crashes that
would explode stock fins. They can however be scratched and they sometimes
get stress cracks if tightened too much or during some crashes. Be sure to
use SE bling or
equivalent sized washers
when screwing in or you can cause stress cracks. Do not over tighten, make
snug and use Loctite. They are made of the same material as plastic
eyeglass lens, so to keep them looking great, use care when handling. Wash
carefully with water and pat dry rather than rubbing.
Note: Peel protective paper off all
Lexan before use (if there is any)
Note: Edges can be sanded with 220
grit sand paper if there are burrs or they get marred
Note: Wash off any white powder or
dirt with water, lightly dry with paper towel.
Copyright 2006 - 2025 RDLohr's Clearly Superior Products. All rights reserved.